Monday, February 11, 2013

DIY Project: Pet Pod Blanket

My dog likes to get covered up in his bed, preferably so only the tip of his snout peaks out. I designed and made him this "pod blanket", to help reduce his frequent blanket frustration, when he just can't get his bedding organized properly by himself. We frequently "tuck him in", but I was hoping this little burrowing blanket would help him get comfortable when we're not around to help him.

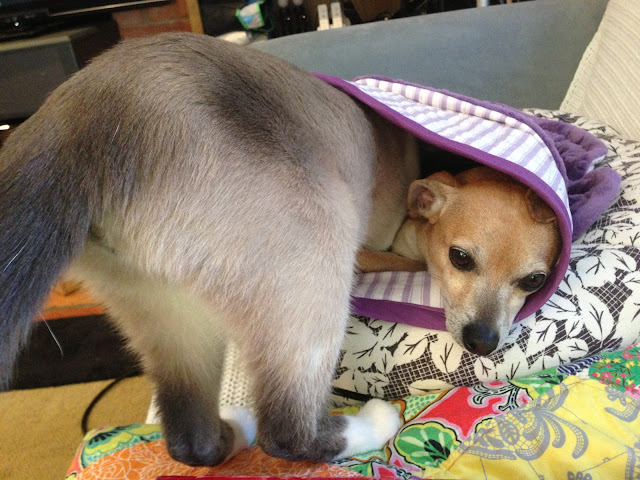
Still having some doubts about this strange blanket.

This blanket consists of a quilted blanket pouch, or pod, in a mix of cotton, batting and minky fabric, it is quilted, with a funnel at the opening, that stays open, to help keep the pod easily accessible. It fits perfectly in my dog's beloved donut bed.

Finally enjoying his little burrowing pod blanket.

I made this blanket yesterday morning, and while it didn't take very long, it actually proved too much for my little sewing machine, and right as I finished the project, it broke. I'm glad I got to complete the project before my machine quit on me, but I have several other projects in the works, that now need to wait until it is fixed to be completed. To add insult to injury, when I first showed my dog his brand new, awesome, sewing-machine-breaking blanket, he hated it. Literary wanted nothing to to do with it. 

Eventually, after trying this suspected torture device for a little while, he seemed to grow to like it. Then the cats discovered it as well, and suddenly we were dealing with Pet War 1 for the rights to the pod blanket. 

 The more the merrier!

While it's really hilarious to see them bicker about who gets to use it, I'm just glad that it actually is getting some use. Initially, when it was hated by everyone, I was afraid it would end up collecting dust in some closet. 

My cat LOVES the pod blanket!!!

Thursday, February 7, 2013

DIY Project: Bunting Garland Photo Prop

I made these bunting garlands to use as photo props for an upcoming photo shoot with my baby niece, but of course, it could just as well be used as decor for a nursery, as a party prop, or whatever else that could benefit from the addition of a charming little banner.


This is a very simple project, similar to my Retail Knockoff version of Kata Golda's Winter Holiday Banner, but this time in cotton fabric instead of Felt. I made a few different versions.

DIY Project: Bunting Garland Photo Prop

For one banner, personalization optional.

What you need:

Cotton fabric in coordinating colors for 15 bunting flags
3 yards twill tape, binding, twine, or ribbon

optional: contrasting fabric for letters

What to do:

1. Cut 15-ish bunting flags of desired shape and size.

from my project sketch  

2. Serge or zig-zag around the raw edges of each flag, to prevent unraveling, or leave them raw, depending on the look you want. Alternatively, cut twice as many flag as needed, and place them in pairs, right side facing, and sew around the hanging sides (not the one that will be attached to the twill tape), then turn right side out and press.

3. Optional: spell a name or greeting by cutting letters of contrasting fabric and sew onto banners. If spelling several words on one banner, leave blank banner as divider between words. IF using a two layer method, add letters BEFORE pairing to hide the seams.

Two double cloth banners, one with closed seams, one with edges left raw.

4. IF using twill tape, space your flags onto your twill tape, either by overlapping, edge to edge, or spaced a couple of inches apart. Fold pennants over the top of the twill tape and sew across to secure.
IF using biascut binding (which is great for banners), just stick your flags inside the fold at desired distance apart, and sew across to secure. Remember to leave approximately 10 inches spare length of tape at each side of the flags for hanging.

Bias-cut binding is perfect for bunting garlands! Stick the flags inside, and secure across the top.

5. Your banner is done!

3 different size & shape bunting garlands, to be used as a photo backdrop.

Saturday, February 2, 2013

DIY Project: Canvas Beach Bag

This is my second try to make one of these beach bags. I made my first attempt with too light weight canvas, so I reworked it into a Reusable Shopping Bag instead. This time, I used a heavier weight canvas, and the resulting bag is more in line with the vision in my head. I used this fabulous tutorial from Elle Apparel as the base for both bags, but altered the method and design a little, to add french seams and a lining.

Absolutely enormous Canvas Beach Bag, here it contains a large size pillow, 
2 huge bath towels, a large water bottle, sun scream and sun glasses in a case, with LOTS of room to spare.

Along with the lining, I also added a large pocket on the back of the bag, and a couple of pockets inside, including a zip pocket in the inside lining. I wanted to be able to keep important little tidbits, such as keys, lip balm, reading material, and cell phone organized, particularly with a bag as huge as this one.

Octopus print lining, zip pocket, and label.

I also attached a key fob (it really sucks to lose your car key in the sand at the beach). The slide pockets are perfect for my phone, and they even fit a Kindle touch!

I love, love, LOVE this lining fabric print! 

The outside is heavy weigh canvas in a wide navy and white nautical stripe. While it won't quite stand up on it's own empty, it does have some structure, and won't topple over that easily when full. For the lining, I got this gorgeous octopus print, that I just love. The combo is perfect! I used French seams throughout the bag, for a neat, durable finish. The large outside pocket was another great addition. I had magazines in mind when I added it, but so far, both time I've used my new bag, that pocket has held my dog's leash and potty bags.

Nautical stripe, external magazine pocket, label, and shoulder strap.

I had planned to do full wrap-around straps, like the ones I did on the shopping bag, but I didn't have enough cotton webbing left. So, instead I attached them on the outside of the bag, and added triangular patches on top, to hide the seams and the raw edge. It wasn't planned, but I really like how it turned out.


This bag is absolutely ENORMOUS! It fits a large beach quilt (although with my new Quilt Carry Strap, I don't need a bag to carry my beach quilt anymore. I used a large pillow instead for the pictures), plus two large bath towels, baby powder (THE BEST for removing sand from skin), sunglasses, sun scream, and e-reader, plus a bottle of water. With lots of room to spare! It keeps my keys and phone secure in designated locations, plus a zippered pocket for my wallet and other little bits and pieces. The straps are comfortable to carry on the shoulder as well. While it's not perfect just yet, it's still really awesome, and I am very happy with my new beach bag!!!

Canvas Beach Bag

Although it's not even February yet, I'm already dreaming of summer, if for no other reason, just so I can use this bag. But summer is months away and I don't know if I have the patience to wait until then. I might just need to schedule a sunny weekend somewhere warm, so I can use it sooner! In the meantime, I'll be making more of these.

Thanks Leanne, for a great tutorial!
I hope you like my additions! 

Materials:

1 yard heavy cotton canvas
1 yard cotton lining fabric
3/4 yard 1 1/2" wide cotton webbing
1 zipper, color coordinated
1 snap hook or split ring

Friday, February 1, 2013

DIY Project: Quilt Carry Strap

This Quilt Carry Strap is of my own design. In fact, I dreamt I made this exact strap last night. I woke up with the design on my mind this morning, and quickly scribbled the idea down on the note pad I keep by my bedside table, for instances just as these. I got up, and put this together. I wanted to see if this would actually work as well in reality as it did in my dream.


Good new! It works! This little Quilt Carry Strap is super easy to make, simple to use, can be made to fit a specific size quilt, or it can, like this one, be adjustable to fit any size. It makes any quilt easily portable, simultaneously keeping it compact and contained, while also supplying a comfortable carrying handle for sensitive hands. It can also be used with a shoulder strap. All without attaching any straps, or handles, to the actual quilt. And it took 20 minutes to make.

Thick, padded carry handle for my sensitive hands. 
And, of course, I had to add one of my fabulous labels.

To carry a quilt using the quilt strap, just fold the quilt lengthwise into thirds (or suitable size, depending on size of quilt), and roll it into a tight roll. Wrap straps around the quilt roll, making sure the handle piece is positioned flat in between them, and then secure straps through the metal loops, and tighten. Repeat with remaining strap. Now the quilt can be carried securely using the handle, or by attaching a shoulder strap.

Quilt strap in action

I did not make a tutorial yet, as there are still plenty of room for improvements. For one, I want to make it in a heavier webbing, and use larger, easier hardware. Perhaps even snap latches. I'll post a tutorial as I've figured those things out. So, while it's not perfect, as a first try, I'm quite happy with this project. I actually used it yesterday, and that made me even happier with it. No more tied-together-with-rope, stuffed-into-bags, or worse; loose, quilts in my car on the way to a picnic or a day at the beach.

Contained, portable, and hand-friendly, thanks to the Quilt Carry Strap.