Showing posts with label Holidays. Show all posts

Friday, December 21, 2012

DIY Project in Action: Cheesy Christmas Ornament Earrings

I made these quick & easy Cheesy Christmas Ornament Earrings before my recent trip to Sweden, to give to all my girl friends for our Christmas Get-Together/Cookie Party.


They were perfect as a fun little party favor.


My beautiful friends modeled them perfectly!


A lot of my Swedish friends now have kids (a few of them even have several!), and they got plastic glitter version, not the ones made with glass ornaments, as they are extremely fragile, and not exactly "baby safe".


I wish I would have made a few clip-on version as well, as little Bonnie, who doesn't have pierced ears, wanted a pair as well. This was an acceptable workaround though.


It was lovely seeing these ladies, and super fun to meet all their littles. Hope y'all like your festive little earrings!

Tuesday, December 18, 2012

DIY Project: Stamped Holiday Cards

This project was purely an accident; I had no plans of making my own holiday cards this year. However, between traveling and catching a nasty flue, I forgot to order our cards. By the time I remembered (last night before bed), it was much to late to order with any hope of receiving them before Christmas, not to mention mailing them out in time.

Initially, I thought I might be able to use some left over cards from a few years ago, but when I went to dig them out, there were only 10 or so left. What to do?

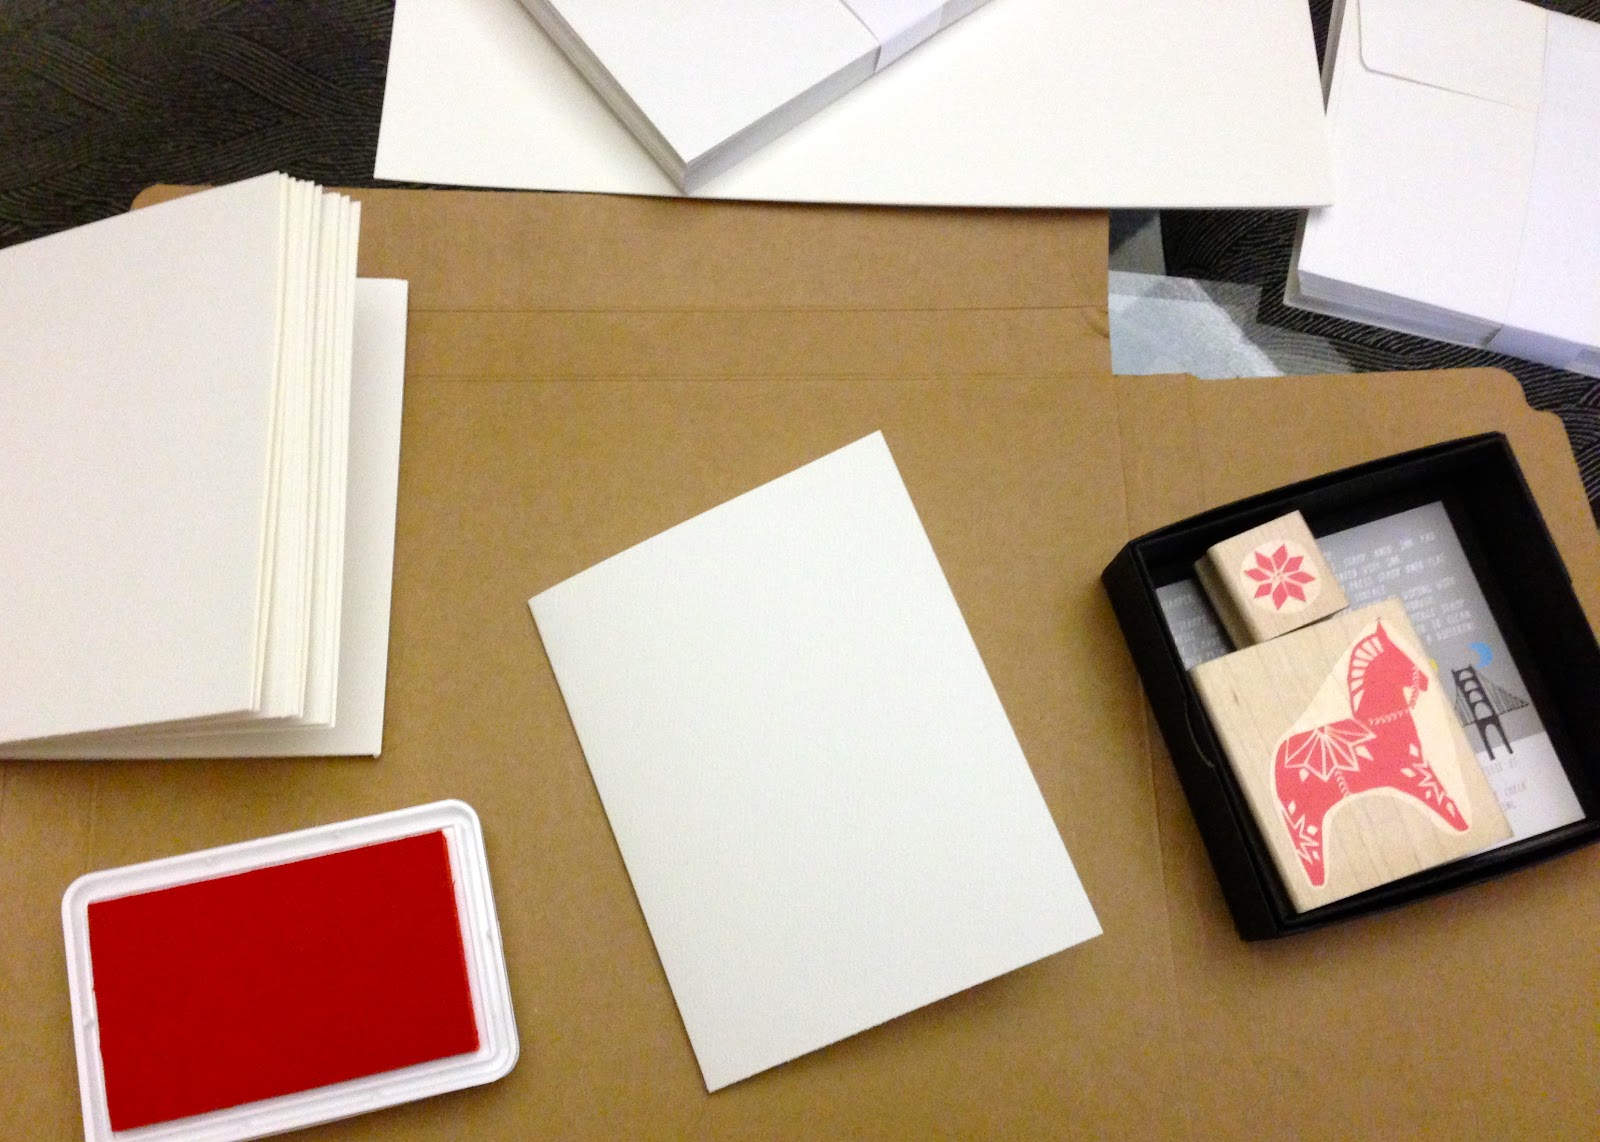
I literary woke up in the wee hours this morning, with the idea of using a stamp I stumbled upon online a while back. At the time, I thought it was so funny to find a Swedish dalahorse style stamp here in the US, so I bought it without any real plan of what to use it for, then put it away in my stationary drawer, and forgot all about it. Until 2 am this morning.


I got up right away, and spent the early morning stamping cards. I snapped a few pics during the process, but just with my phone, so they aren't the best, but I figured I'd share them anyways. 


I'm so happy that I had all the supplies at home already, so I could start right away, but I would have preferred better card stock. (Note to self: stock up on better card stock.) I just so happened to recently have ordered a brand new set of stamp ink pads, in an array of colors, and I chose to go with a classic red for the cards.


The horse stamp also came with an extra little flower stamp, so I used that as well to decorate the cards, and the envelopes.


Initially I had planned on writing a holiday greeting on the outside of the card, but I scrapped that idea as it didn't look that great. I wish I had an alphabet stamp set, and I would have used that. Instead I wrote the greeting on the inside. 


When the cards were all done, I figured I might as well finish them for shipping. A few hours later, all our holiday cards are made, signed, addressed, and ready to be be dropped in the mail box today!

Wednesday, December 5, 2012

DIY Project: Felt Christmas Tree with Ornaments

I got this idea from Pinterest (of course) months and months ago, and while there are countless versions of this project out there, I really like this tutorial from the blog Johnny In A Dress.

As soon as I first saw this, I thought of a certain little Swedish girl, who I knew would LOVE something like this for the holiday season. But the holidays were still very far away at the time, so I filed it away for later in the year.


I finally made this project this week, and the whole thing took about 30 minutes from start to finish! All you need is about 1 yard of green felt, plus some colored felt for decorations, a scissor, and hot glue.


Unlike the original tutorial, I used a mix of plain and patterned felt, instead of decorating the ornaments myself. I also hot-glued a star to the top of the tree.


I added a couple of gift tags to some of the gifts under the tree, one with the gift-recipient's name, and one with "God Jul", which is Swedish for Merry Christmas.


I also added one gift with an unsealed top edge, to use as a pocket for the ornaments when not in use.


I attached the tree using wide, double-sided tape, and it worked brilliantly.


I hope this little felt tree will give a certainly little girl, who according to her mom "likes to re-decorate the tree every single day", a lot of joy this holiday season.

Monday, December 3, 2012

DIY Project: Candy Cane Centerpiece

I made these Candy Cane Centerpieces for the first time last year, after finding a tutorial on Pinterest, and I knew right away that this was a project I would repeat many times over. However, this year when I went back to my old pin to refresh my memory, the link seems to be broken, and the tutorial missing. I had planned to link to it, with photos of my finished project, but instead I'm posting my method as I remember it. I don't know how closely it matches the original tutorial, as I haven't' read it in a year (should be fairly close though, as this is a really easy project), but this worked perfectly for me today, and the end result looks fairly similar to the original picture that was my inspiration. If you do happen to find the original tutorial, please let me know so that I can link and credit the original source. 


DIY Project: Candy Cane Centerpieces

These are perfect for a holiday party, a quick hostess gift, or as part of your holiday decor. Besides roses, I also filled a few of them with candles, and both looked fabulous (photos to come).

What you'll need:
1 clean glass container
1 rubberband or elastic that fits tight around the glass container
candy canes (number depends on size of glass container)
ribbon (length depends on size of glass container)
red roses and greenery OR large candle or luminary

What to do:
1. Fit elastic around the glass container.
2. Add candy canes between the elastic and the glass, making sure the elastic is tight enough to hold the candy canes in place. Continue to add candy canes until they cover the entire circumference of the glass container.
3. Straighten candy canes, and tie ribbon around candy canes, on top of the elastic, hiding it.
4. Your base is now finished. Trim roses to the correct length, making sure flowers form a slight dome shape, and arrange together with greenery in the glass container. Add water. Alternatively, add a candle instead.
5. Done!


Sunday, December 2, 2012

DIY Project: Quick and easy Cheesy Christmas Ornament Earrings

I saw these earrings this morning at Target, and thought they would be perfect for a cheesy holiday get-together with some fabulous, holiday-loving girlfriends. I also realized I already had all the necessary supplies to make my own version at home.


This is what I came up with.


I made a bunch of them, in different shades of red & silver, and I cannot wait to wear these cheesy things to various holiday-related shenanigans! Now I just need a hideous reindeer sweater & decide if I'm mixing or matching the ornaments!

This project is so simple that it barely even needs a tutorial. Still, here are the very simple instructions to make your own Cheesy Christmas Ornament Earrings. Making time is approximately 2 seconds. No kidding.

DIY Cheesy Christmas Ornament Earrings

To make one pair of Cheesy Christmas Ornament Earrings.

What you need:
2 French wire earring hooks
2 mini ornaments, glass or plastic
2 jump rings


What to do:
1. Open jump ring just enough to slip on 1 Sterling silver French wire earring hook, and one mini ornament.


2. Close jump ring.
3. Repeat once again, to make a pair.
4. Done!

Price Comparison:

Original inspiration:
Happy Holidays Ornament Earrings, Target, $7.99 per pair

DIY Retail Knockoff:
$1 per pair


Saturday, December 1, 2012

DIY Project: Winter Holiday Banner (Retail Knockoff)

I saw these adorable Kata Golda Winter Holiday Banners on Gilt the other day, for $100, discounted from the original $140. First I thought "Cute!", followed by "$100 for $10 of felt?!?". But... but... this thing is a perfect match for my Holiday decor! It would look so cute in my house!!! However, while very cute, it's worth nowhere near $100. So, I tried to make something similar myself.

Image source: katagolda.com


This is what I came up with.

DIY Project: Winter Holiday Banner Tutorial (Retail Knockoff)

I used the original specifications as a guide. Pennants are 7"x7", spelling the words "Merry Christmas" with one blank pennant included to create a space between words. Length is 86" plus an extra 32" of twill tape for hanging on each end.

What you will need:


White felt
Red felt
Light green felt
150" 0.75" twill tape, natural (I used red because I had some, but if I did another banner, I would make sure it was natural, or white instead)
Sewing machine with matching thread OR hot glue gun
apple green embroidery thread and needle (optional)

What to do:

1. Cut 8 red 7"x7" felt pennants, 7 white 7"x7" pennants, and 14 3"x3" squares of the apple green felt.


2. Cut out your letters from the light green felt squares, freehand or use a pencil to trace them first. Also cut out 6 green holly leaves, and 4 copies of the three red berries (or however many you would like, I made a few less than the original).


3. Attach letters to the pennants. The original banner have the letters attached by hand stitching, using a matching green thread, and they may or may not have been glued on first. You can either hot glue the letters in place, or attach them using a sewing machine, and then adding the green stitching afterwards, alternatively, just doing the hand stitching. I felt a bit iffy about the quality & longevity of my hand stitches, so I machine-stitched mine first. Remember to leave one blank pennant to create a space between the words.


4. To attach the pennants to the twill tape, lay your tape out on a large work surface, and measure 33" from one end. Place your pennants in the proper order, overlapping slightly (around 1") with each one. Don't forget the blank pennant between the words. For the original look, fold the pennants over the twill tape and zigzag over the fold. If you're using bias cut tape in place of twill tape, like I am, instead fold the double folded tape over the edge of the pennants, and attach either by matching stitching across each pennant on the twill tape (like the original), or, by using a hot glue gun.


5. Assemble your leaves and berry pieces for the decor, and lay them back to back, with the tape in the middle, on either side of the letters. Hand, machine-stitch or hot glue the berry decor onto the twill tape, one on each side of the pennants. I machine-stitched the berry pieces together over the tape, with the leaves in between.


6. If you want the same finish as the original, hand-stitch the light green embroidery thread around all the letters. This step isn't necessary, obviously, and it takes this project from a quick 30 minute project to a rather time consuming endeavor. In this case, the extra work is actually worth it, and the hand stitches add a really nice touch. While my banner looked fine before the stitches, it looks fantastic with them!


7. Voila! While my banner has slight differences from the original, and my photo isn't quite as fancy, in person they are actually very similar, and I'm very happy with my little holiday banner. It's very festive!


Cost Comparison:

Original:
$140, through Kata Golda website, or $100 at Gilt

DIY Retail Knockoff (generous approximation, since I had the supplies left over from previously projects): 
Felt: $5
Twill tape: $5
Embroidery thread & needle: $5
Total: $15

$15 compared to the original $140! Not a bad "retail knockoff". This project can be altered to fit any occasion, and I'm making a 'Happy Birthday!" one next. Of course, I'll post photos when it is finished.

Friday, November 30, 2012

DIY Project: Advent Calendar

I made this simple little advent calendar for my husband, and I am currently in the process of filling it with a mix of small toys, PS3 games, travel gadgets, candy, DVDs, and a few small tools and randoms funny bits, before he's set to open the first bag tomorrow. Advent calendars were such a fun part of my Christmas celebration as a kid, and I'm excited to see my husband experience this holiday awesomeness as well.


DIY Project: Advent Calendar
This is a fairly easy DIY project, which requires minimal sewing skills, and a little bit of painting, but it does take some time to complete. I made my bags around 8" by 10, but this project can easily be sized up or down. 

What you will need:
1 1/2 yards linen, burlap, or fabric of choice
white fabric paint
fabric brushes, one thin, one wide
twine
5 packages of red double folded bias cut tape, plus 150"extra for hanging

What to do:

1. Start by making your drawstring bags. Cut fabric into twenty-five 8"x20" rectangles. Fold each double, right side in, creating 8"-by-10" pouch. Here you can either serge each raw edge, to prevent unraveling, or wait until construction and do it then. 


2. Close each side of the bag, by stitching along each 10" side, with a 1/4" margin, then go over the raw edge again with your zig-zag (or skip the two steps, and use a serger).


3. Turn bag right-side-out. Fold 1 inch of the top of each pouch down inside the pouch, and stitch all around the bag, closing the last raw, top edge.


4. Your basic pouch is now done. Repeat 24 times.


5. First, put a folded piece of cardboard, thick paper, or a paper towel, inside each bag before you start painting, to prevent paint seeping through the first layer from gluing your bags shut as the paint dries. Using a thin fabric paint brush, trace the outline of each number on one side of each completed bag, then fill in evenly with a larger brush. I freehanded my numbers, and thus they are all a bit different, but you could easily use a stencil or pencil to assist with the numbers.


6. Let the paint dry on all your completed bags, and then remove the protective paper inside.


7. To add the red draw string "tunnel", measure a length of binding that fits around the bag, with a very slight overlap. Start attaching the binding, by folding over the raw edge about 1/4", and then sewing along one side, using the top stitch from Step 3 as your guide. When you get to the end, fold raw edge under, and finish the seam. Repeat on the other side.


8. Cut 25 lengths of twine, each long enough to wrap around the bag, with 6-8 inches to spare (a longer twine makes it a lot easier to untie the bags when they are full). Using a safety pin, thread the twine through the drawstring "tunnel" of each bag, and close with a knot. Repeat 24 more times. Melt the raw edge of the twine a little, if necessary, to avoid unraveling.


9. Voila! Your calendar is finished, ready to be hung, and filled with goodies.


Tuesday, October 30, 2012

DIY Project: Little Monsters Halloween Manicure

From my Instagram.

I made this Halloween themed Little Monsters manicure yesterday, and thought I'd share it here as well, so that friends who do not have Instagram can see it too. First I pained each finger nail a different color (2 coats), and then went to town with white and black polish to make the faces, all free-hand. I started with the white, making the eye balls and teeth using a thin brush, and then went over with the black afterwards. I topped it off with my favorite top coat from Deborah Lippman to make it durable. Super easy, and so cute!

Nail Polishes used:
(from left to right)
Deborah Lippmann 'Addicted To Speed' Top Coat
Deborah Lippmann 'Girls Just Want To Have Fun'
L'OREAL 'Club Prive'
Maybelline 'Iced Queen'
L'OREAL 'Now You See Me'
Essie 'Peach Daiquiri'
Maybelline 'Porcelain Party'
Sephora by OPI 'What's A Tire Jack'

Saturday, April 7, 2012

Swedish Easter.

Glad Påsk & Happy Easter!

I know for a lot of people Easter is a very import, religious holiday. It is an important holiday for me too, but for other reasons. Lately, I've come across some people seemingly unaware of the fact that Easter is celebrated in different ways in different places, and that it's meaning vary as well. I figured I would share my Easter traditions, to offer a different view on this Easter holiday. Påsk, which is what Easter is called in Sweden, was always one of my favorites as a kid. I haven't lived in Sweden for a decade, but I still love celebrating Påsk, and I guess I always will.

So, what is Swedish Easter?
It's a celebration of Spring, that involves heaps of candy (Swedes LOVE candy, on average 18Kg of candy are consumed per person each year - a large portion of which gets eaten during Påsk celebrations), big bonfires in fields all over the countryside, witches, a variation of trick-or-treat-ing, and a Spring Feast. AND you get time off from school. As a kid, it was AWESOME! As an adult, it is still pretty awesome.

Before Easter week, Swedes decorate their homes for Påsk with large vases filled with Spring branches and twigs, still covered with Spring buds, and colorful feathers are added to the branches. Painted eggs, Videung (pussy willow) branches, and big bouquets of Daffodils are also a must.

A traditional Swedish Påsk ris

According to Swedish folklore, on skärtorsdagen (Maundy Thursday) all the witches in the land would fly across the night sky on their brooms, all converging on Blåkulla (Blue Hill) for their annual Witches' Meeting. So, on this same day, Swedish kids dress up as witches, in aprons, and freckles, and brooms, and walk around the neighborhood knocking on doors, much like Halloween's trick-or-treating here in the US.

Instead of "trick or treat", we would give each person an Easter Letter, a homemade Spring-themed drawing, folded up in a triangle, and in return we would get candy or money. I remember many evenings leading up to Påsk spent sprawled on the family room floor with my friends, drawing little yellow chicks, daffodils, trees with tiny breaking-out leaves, eggs, broom-flying witches, and bunnies. Everything that means Spring.

Swedish Påskbrev from early 1900's
Image Source: Sagomuseet

By Thursday I'd have a big basket full of completed letters. All decked out in my witch's outfit, I'd carry that basket, exchanging letters for candy, until my arm fell off, or the all my letters were gone, which ever came first. Lucky for me, it was always the letters. Either way, we always had such a fun time! As a kid growing up in Sweden, skärtorsdagen was one of the most epic days of the year, and I have very fond childhood memories of this day.


Swedish kids dressed up as Easter Witches
Image Source: Lena Granefelt

As if all of that wasn't enough, the festivities of skärtorsdagen are followed by a Påsk feast on Saturday, which is Påskafton, (the Eve of Easter). Traditionally a smorgåsbord of Spring-themed foods are served, including lots of egg dishes, lamb, and other tasty things, representing the rebirth of the year after the long winter. Everything is washed down with Påskmust (a special soda only available during Easter), Påsköl (Easter beer), snaps, & drinking songs. That evening, to deter the witches from stopping to cause trouble in your neck of the woods on their way home from Blue Hill, large bonfires are lit in the fields all around [some parts of] the country. The firewood for these Påsk fires have been collected for months, and include everything from Christmas trees to branches blown down in winter storms.

Påskbrasa, Swedish Easter fire

In the evening, my family would always go to one of these bonfires nearby. It is cold still in Sweden at that time of year, and dark too. But there were always lots of people around the fire, and someone brought hot cocoa, another brought mugs, and all the children would get to stay up late, running around the fire and the dark fields. It was magical.

On Sunday, we would get our highly anticipated Påskägg, a large paper mache egg, filled with candy (as a Swede, there is no such thing as too much candy). In my family, our eggs would be hidden, usually indoors, but outside as well weather permitting, and we would have to find them, which was very fun. However, this tradition varies, as some of my friends were given their egg sans the hunt. We would then snack on candy & leftover Easter foods all day.

My husband's Påskägg this year.

No matter what your Easter traditions are, I wish you a very Happy Easter.
Glad Påsk, everyone!