Saturday, December 1, 2012

DIY Project: Winter Holiday Banner (Retail Knockoff)

I saw these adorable Kata Golda Winter Holiday Banners on Gilt the other day, for $100, discounted from the original $140. First I thought "Cute!", followed by "$100 for $10 of felt?!?". But... but... this thing is a perfect match for my Holiday decor! It would look so cute in my house!!! However, while very cute, it's worth nowhere near $100. So, I tried to make something similar myself.

Image source: katagolda.com


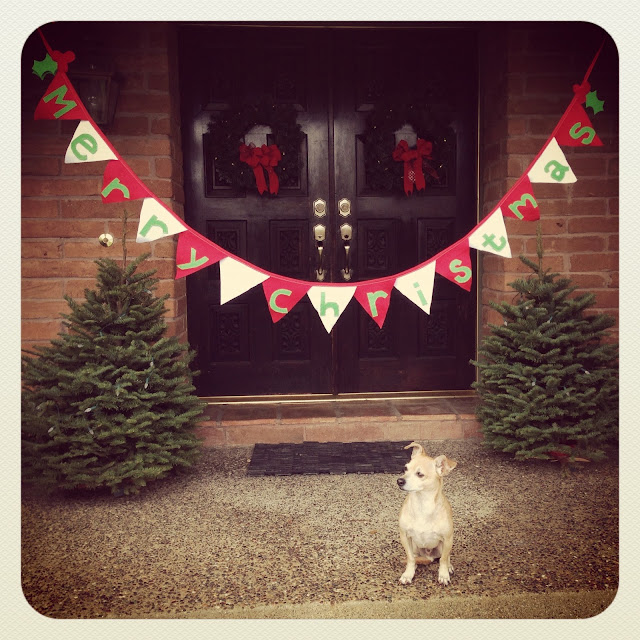
This is what I came up with.

DIY Project: Winter Holiday Banner Tutorial (Retail Knockoff)

I used the original specifications as a guide. Pennants are 7"x7", spelling the words "Merry Christmas" with one blank pennant included to create a space between words. Length is 86" plus an extra 32" of twill tape for hanging on each end.

What you will need:


White felt
Red felt
Light green felt
150" 0.75" twill tape, natural (I used red because I had some, but if I did another banner, I would make sure it was natural, or white instead)
Sewing machine with matching thread OR hot glue gun
apple green embroidery thread and needle (optional)

What to do:

1. Cut 8 red 7"x7" felt pennants, 7 white 7"x7" pennants, and 14 3"x3" squares of the apple green felt.


2. Cut out your letters from the light green felt squares, freehand or use a pencil to trace them first. Also cut out 6 green holly leaves, and 4 copies of the three red berries (or however many you would like, I made a few less than the original).


3. Attach letters to the pennants. The original banner have the letters attached by hand stitching, using a matching green thread, and they may or may not have been glued on first. You can either hot glue the letters in place, or attach them using a sewing machine, and then adding the green stitching afterwards, alternatively, just doing the hand stitching. I felt a bit iffy about the quality & longevity of my hand stitches, so I machine-stitched mine first. Remember to leave one blank pennant to create a space between the words.


4. To attach the pennants to the twill tape, lay your tape out on a large work surface, and measure 33" from one end. Place your pennants in the proper order, overlapping slightly (around 1") with each one. Don't forget the blank pennant between the words. For the original look, fold the pennants over the twill tape and zigzag over the fold. If you're using bias cut tape in place of twill tape, like I am, instead fold the double folded tape over the edge of the pennants, and attach either by matching stitching across each pennant on the twill tape (like the original), or, by using a hot glue gun.


5. Assemble your leaves and berry pieces for the decor, and lay them back to back, with the tape in the middle, on either side of the letters. Hand, machine-stitch or hot glue the berry decor onto the twill tape, one on each side of the pennants. I machine-stitched the berry pieces together over the tape, with the leaves in between.


6. If you want the same finish as the original, hand-stitch the light green embroidery thread around all the letters. This step isn't necessary, obviously, and it takes this project from a quick 30 minute project to a rather time consuming endeavor. In this case, the extra work is actually worth it, and the hand stitches add a really nice touch. While my banner looked fine before the stitches, it looks fantastic with them!


7. Voila! While my banner has slight differences from the original, and my photo isn't quite as fancy, in person they are actually very similar, and I'm very happy with my little holiday banner. It's very festive!


Cost Comparison:

Original:
$140, through Kata Golda website, or $100 at Gilt

DIY Retail Knockoff (generous approximation, since I had the supplies left over from previously projects): 
Felt: $5
Twill tape: $5
Embroidery thread & needle: $5
Total: $15

$15 compared to the original $140! Not a bad "retail knockoff". This project can be altered to fit any occasion, and I'm making a 'Happy Birthday!" one next. Of course, I'll post photos when it is finished.

Friday, November 30, 2012

DIY Project: Advent Calendar

I made this simple little advent calendar for my husband, and I am currently in the process of filling it with a mix of small toys, PS3 games, travel gadgets, candy, DVDs, and a few small tools and randoms funny bits, before he's set to open the first bag tomorrow. Advent calendars were such a fun part of my Christmas celebration as a kid, and I'm excited to see my husband experience this holiday awesomeness as well.


DIY Project: Advent Calendar
This is a fairly easy DIY project, which requires minimal sewing skills, and a little bit of painting, but it does take some time to complete. I made my bags around 8" by 10, but this project can easily be sized up or down. 

What you will need:
1 1/2 yards linen, burlap, or fabric of choice
white fabric paint
fabric brushes, one thin, one wide
twine
5 packages of red double folded bias cut tape, plus 150"extra for hanging

What to do:

1. Start by making your drawstring bags. Cut fabric into twenty-five 8"x20" rectangles. Fold each double, right side in, creating 8"-by-10" pouch. Here you can either serge each raw edge, to prevent unraveling, or wait until construction and do it then. 


2. Close each side of the bag, by stitching along each 10" side, with a 1/4" margin, then go over the raw edge again with your zig-zag (or skip the two steps, and use a serger).


3. Turn bag right-side-out. Fold 1 inch of the top of each pouch down inside the pouch, and stitch all around the bag, closing the last raw, top edge.


4. Your basic pouch is now done. Repeat 24 times.


5. First, put a folded piece of cardboard, thick paper, or a paper towel, inside each bag before you start painting, to prevent paint seeping through the first layer from gluing your bags shut as the paint dries. Using a thin fabric paint brush, trace the outline of each number on one side of each completed bag, then fill in evenly with a larger brush. I freehanded my numbers, and thus they are all a bit different, but you could easily use a stencil or pencil to assist with the numbers.


6. Let the paint dry on all your completed bags, and then remove the protective paper inside.


7. To add the red draw string "tunnel", measure a length of binding that fits around the bag, with a very slight overlap. Start attaching the binding, by folding over the raw edge about 1/4", and then sewing along one side, using the top stitch from Step 3 as your guide. When you get to the end, fold raw edge under, and finish the seam. Repeat on the other side.


8. Cut 25 lengths of twine, each long enough to wrap around the bag, with 6-8 inches to spare (a longer twine makes it a lot easier to untie the bags when they are full). Using a safety pin, thread the twine through the drawstring "tunnel" of each bag, and close with a knot. Repeat 24 more times. Melt the raw edge of the twine a little, if necessary, to avoid unraveling.


9. Voila! Your calendar is finished, ready to be hung, and filled with goodies.


Thursday, November 29, 2012

DIY Project in action: Bonnie's Quilt

My friend shared this photo today, of her baby girl cuddling up in the quilt I made her back in October.  It's always so fun to see one of my handmade gifts, that I've put a lot of time, energy & creativity into making, being put to use by the gift-recipient. Warms my heart.

Image source: Sara Andersson's Instagram (with permission)

Wednesday, October 31, 2012

DIY Project: 1 Day Baby Quilt

I made this little baby quilt today, all the way from start to finish in one sitting! It is a gift for one of my Swedish friend's baby, and I really hope they both will like it. I used thicker batting this time, compared to my last quilt, as this is for a younger baby, I was thinking it could be used both as a crib-sized quilt and as a baby play mat. I was a bit worried that the thicker batting might make it turn out heavy, like some thicker quilts can get, but luckily it isn't heavy at all. Instead it has a light fluffiness that is very cuddly. 


I wanted a simple design to showcase this horse pattern print, which reminded me of a Swedish Dala horse, a very traditional, Swedish symbol. The horses were pretty large, so I kept the blocks large as well, in order to display the pattern in full. I added in two coordinating solids, and two coordinating prints.

Light aqua backing fabric, and simple, square quilting pattern.

I actually wish I could have gotten my hands on more of the "Dala horse" print, 'Wooden Horses' from Michael Miller, because I really like it, and I would have preferred to use it for the backing as well. Instead I went with the same minty aqua solid cotton as I mixed into the quilt top. In the early evening light of the time when I took these photos, the color look almost white.

Quilt, pre laundry. Here you can also see that the backing fabric is light aqua, not white, as it looks like in the photo below. 

I used a simple grid pattern for the quilting. Initially I had wanted to go with something more similar to my last quilting pattern, but as neither of the fabric in this quilt had a print with a suitable patterns, so I decided not to. The fluffier batting really goes well with this simple, square quilt pattern, as each square is slightly puffed up.

Quilt, post laundry. You can see the slight puffiness of each square, compare to above.

For the binding, I used a homemade coral dot binding, the same one I used on the Elephant blanket. Between the large blocks and the simple grid quilting, this entire project, from cutting to binding, took around 4 hours. It is crib sized.

Fabrics:

Quilt top:
Jay-Cyn Designs for Birch Fabrics, Mod Basics, Abacus Coral
Jay-Cyn Designs for Birth Fabrics, Mod Basics, Solid Coral
Michael Miller, Wooded Horses, Charcoal
Robert Kaufman Kona Cotton, Coral
Dots on white, I don't know the name, or the make

Backing:
Robert Kaufman Kona Cotton, Light Aqua

Binding:
Cay-Cyn Designs for Birch Fabrics, Mod Basics, Dottie Cream Coral

Tuesday, October 30, 2012

DIY Project: Little Monsters Halloween Manicure

From my Instagram.

I made this Halloween themed Little Monsters manicure yesterday, and thought I'd share it here as well, so that friends who do not have Instagram can see it too. First I pained each finger nail a different color (2 coats), and then went to town with white and black polish to make the faces, all free-hand. I started with the white, making the eye balls and teeth using a thin brush, and then went over with the black afterwards. I topped it off with my favorite top coat from Deborah Lippman to make it durable. Super easy, and so cute!

Nail Polishes used:
(from left to right)
Deborah Lippmann 'Addicted To Speed' Top Coat
Deborah Lippmann 'Girls Just Want To Have Fun'
L'OREAL 'Club Prive'
Maybelline 'Iced Queen'
L'OREAL 'Now You See Me'
Essie 'Peach Daiquiri'
Maybelline 'Porcelain Party'
Sephora by OPI 'What's A Tire Jack'

Sunday, October 28, 2012

DIY Project: Pin Cushion Jars Tutorial

I love these Pin Cushion Jars! They look cute, are easy to make, useful when you're sewing, and last but not least, you can keep pins safely tucked away inside while you're not using them. This is a quick and easy little project to put together, that makes a great gift for anyone who likes sewing. I made these for the fabulous ladies in my book club (sorry ladies for the spoiled surprise).


DIY Project: Pin Cushion Jars Tutorial
Each jar takes but minutes to complete, and lends itself well to making a bunch at a time. It is a perfect scrap buster.

What you'll Need:
canning jars, any size
fabric scraps - I used some charm pack leftovers from another project
batting
hot glue

What to do:
1. Unscrew your lid, and take it apart.


2. Lay the flat piece on a fabric scrap, and cut around it, with 1-2 inches extra fabric around all sides (since I used fabric from a charms pack, I didn't bother making mine perfect circles and instead kept them square, but it didn't make a difference). Then cut your small circle. Using your lid as a guide, cut your circle about 1/2 inch smaller than the lid.
3. Place your lid face down on your larger fabric piece, grab some batting and stuff under the lid, folding the extra fabric over the lid edges.


4. Add a line of glue to the lid, under the folded flap of fabric, and attach the fabric as smoothly as you can. Work your way around the lid, gluing and smoothing down the fabric as you go. If needed, add some more batting before you clue the last bit of the circle.


5. Trim off any excess fabric.
6. Glue your small circle on top of the fabric edges, pressing down firmly, to prevent as much bulk as possible. Let dry.


7. Place lid ring on top of the fabric side, and let the stuffed pouff poke out of the hole, screw the lid onto your jar and you're done!


Stuffed with some goodies, like candy, a bundle of fat quarters, or small sewing supplies, they make a nice little gift for crafty friends.

Saturday, October 27, 2012

DIY Project: Bonnie's Quilt

I started this quilt on Wednesday, as soon as I finished this Elephant Blanket, and I've basically been sewing furiously ever since. I cut and pieced the quilt top that day, then did all the quilting and the binding yesterday. While I wouldn't recommend making 2 quilts in 4 days, given the resulting hunched-over-your-sewing-machine-for-hours-on-end crippling back and shoulder pain, I'm really pleased with this project. Definitely worth the pain.


The design of this quilt was entirely inspired by the prints used. I went with this large simple blocks to showcase the different coordinating patterns in the line, and quilted each block according to its pattern. The large block size made the quilt-top piecing come together quickly, which was good, since the quilting pattern added  a TON of additional work and time to the quilting process.


Quilt top.

At a distance you can't really see the quilting patters, but up close it is more noticeable.

Quilt top close up.

The relatively plain backing is where the different quilting patters really stand out.

Quilt back and quilting pattern, close up.

I'm happy with the design. In fact, this quilting pattern is my favorite of all the ones I've made so far (and this is my ninth quilt!). I used really light, soft, organic bamboo batting, and high thread count cotton fabric throughout, and as a result, this quilt is extremely soft and cuddly! I really, really, really LOVE how this quilt turned out. 

Quilt top and back.

Since I made this quilt for my friend's baby girl, Bonnie, I decided to try some more appliqué by adding her name to the otherwise solid, white backing, using leftover prints from the quilt top.


 Appliqué and quilt pattern, full. 

I did a simple zig zag around the letters. A few of them turned out a bit crooked, but I kind of like the whimsy it brings.

 Quilting pattern and appliqué name.

For the binding, I did an all-white double binding, using first the overhanging backing fabric, and then I added a homemade white binding on top of that. Usually I do this when I have two contrasting colors, so that you can see a thin line of the backing fabric peek out under the contrasting [top] binding, like this, but this time I did it mainly for durability. The bottom layer of binding also makes the top binding a lot easier to apply. Doing it this way means I do not need to pin or secure the binding in any way before I attach it. I can just hold it in place while sewing. Although it's white-on-white, you can see the bottom binding peeking out under the top one.

Label, double binding, and accurate representation of colors.

Some of these photos were taken in soft evening light right after I finished the quit, and others I took today in sharper mid-morning light, which changes the way the colors look from photo to photo, but this one (above) is an accurate representation of the color scheme.

I really, really hope Bonnie will like her little quilt!

Fabric used:

Simpatico Organic fabric collection by Michelle Engel Bencsko for Cloud9 Fabrics
Robert Kaufmann Organic White Cotton


I couldn't help to add this hilarious out take where Hubby's feet got caught in frame.