Sunday, June 24, 2012

Redux: "Quicky" Yard Panel Baby Blanket

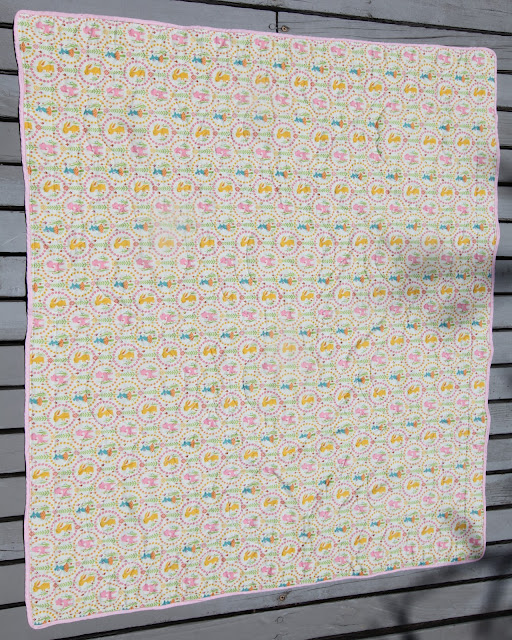
I made another baby blanket yesterday, using the same yard panel as my first Quicky Baby Blanket tutorial, but in pink this time.

Pink Yard Panel Baby Blanket

I did change a few things, compared to last time:
           1. moved the location of my label, from the binding, to the body of the quilt.
           2. quilted the background in diagonal stripes

Image source: my Instagram

           3. this time I tried rounded corners, and used a very skinny binding, a left-over from another project

Rounded corners, skinny binding
         
              4. a different, but still coordinating, backing print

 Quicky Yard Panel Baby Blanket backing

Overall, I'm pretty happy with this blanket. It is very light, but still cuddly. It took a little over 2 hours to make from start to finish, and only that long because of the added trickiness of working with such a slim binding. While I might try the rounded corners again, I'll definitely stay away from super skinny binding in the future. So not worth the effort, but it worked well on this light little blanket. I sent it off with a set of my Month-to-Month Onesies, and together they will hopefully make a great, useful gift.

Fabrics:

Top:
1 yard (Yard Panel) Sheri McCulley Studio, Woodland Tails, Panel Pink

Backing:
1 yard Sheri McCulley Studio, Woodland Tails, Friends, Green

Binding:
pink bias cut binding - left over from another project

Friday, June 22, 2012

DIY Project: Iron-On Month-to-Month Onesies

It seems every single person I know have been pregnant this year, and now all those babies are starting to arrive in droves. Another birth announcement seem to show up every week, and this week there were two!

Now, what to give a baby that it wasn't already given at the baby shower? Instead of adding another beeping plastic toy to the inevitable collection, I really wanted to give a gift that would create something memorable for the parents. I first saw these Month-to-Month onesies online a while ago, and thought it was such a great way to document a baby's first year. Initially, I ordered some here, and when I received my order and realized how simple these are to make, I made a bunch of my own versions for gifts, using transfer paper and my printer. Easy as pie!


Welcome Baby Gift: Iron-On Month-to-Month Onesies 

What You'll Need:
Iron-on numbers, 1-12 - make your own (cheap, and very easy but you need transfer paper and a printer), or purchase ready-made
2 x onesies Size 0-3 Months (1, 2)
3 x onesies Size 3-6 Months (3, 4, 5)
3 x onesies Size 6-9 Months (6, 7, 8)
2 x onesies Size 12 Months (9, 10)
2 x onesies Size 18 Months (11, 12)

I added a gift card to a photo book printing company, to make a "Baby's 1st Year" photo book with the monthly pictures.

Directions:
1. Make iron-on number designs, using editing program of choice, then size and print. Make sure you print on the correct side of the transfer!
2. Cut around each design, removing any extra transfer material.
3. Arrange each number with the appropriately sized onesie, and make sure they are centered. Check & double check that you have them arranged and paired up correctly, because you can't undo them once they are ironed on.
4. Iron numbers onto onesies, making sure that the garment is completely flat and to put some thick paper in-between fabric layers to prevent transfer through the garment. Follow the directions on your iron-on transfer for appropriate ironing time and temperature.
5. Wash and dry onesies inside out, and fold so that the numbers can still be seen.
6. Add onesies to a gift box, in numerical order, making sure the numbers are visible form the top.
7. Add a card (and the gift card), and close lid. Tie box with ribbon.
8. The gift is ready to be gifted!

Iron-on number designs - 
I made a few different ones in several color codes, 
both very simple ones like these, some patterned, and a few themed sets.


These Month-to-Month Onesies gifts sets were VERY quick and easy to make, took less than 30 minutes start to finish, at a total cost of approximately $40 per set, most of which is the cost of the onesies, as iron-on supplies are very cheap if you make them yourself. I find the Etsy versions, of both the iron-on transfers as well as the completed sets (which are listed for more than $70), to be really over-priced for what you get, but maybe that's just because I've made my own and know just how easy & cheap they are to make...?

Month to Month Onesies, set of 12

Overall, I'm happy with these gifts, and hopefully they will give these busy new parents a chance to document the first year of their baby's life in a fun, memorable way. 

Wednesday, June 20, 2012

DIY Project: Motivational Gym Cards

This is definitely an odd one, and if you're one of those gym rats who just loves working out and nothing can tear you away from your daily cardio fix, this one is not for you. This one is for the people who find that making yourself spent 60 nominates in the gym every day is about as easy as dragging a dead donkey through an obstacle course; for the poor souls who feel time slow to a next-to-frozen-crawl as soon as your feet touch the exercise equipment; for the struggling gym-rats-in-progess who want to quit THE ENTIRE TIME, but continue anyways, usually fueled by an internal Smeagol-esque back and forth, which if spoken out loud, would surely qualify you for the psych-ward. This one, my dear fellow exercise-dreaders, this one's for you.

The inspiration for this DIY, besides the [obvious] CRAZY in my head, was twofold:
          1. A gift sent to me by a friend earlier this year, which contained a stack of lovely quotes
          2. A large collection of super motivational fitness quotes on Pinterest - which really isn't where you need them, huh?

A few of my gym cards...
Yes, you can laugh.

Motivational Gym Cards

There are a number of ways of making these, from writing on flashcards, to laminated cards, to photo prints. Choose the way that works for you.

What You'll Need:
A number of motivational fitness quotes - check Pinterest for ideas
Add any personal goals as well
cardstock, flashcards, or photo paper of desired size - my cards are 4"x6"
printer, photo printer, or marker
rubber band or small fabric pouch

Directions:
1. Collect your quotes, choosing those that speak to you. Add your personal goals, short-term & long.
2. Print quotes - either by hand, on your printer, or photo printer
3. Protect - initially I had planned to laminate mine, but as I printed mine on photo paper, they already have some protection, and I figured it would be a wasted effort as I'll probably change these out quite often, but to each their own. This is more important if you use paper, or want them to last a long time.
4. Make portable - I made a little drawstring pouch for mine using fabric scraps, which took about 5 minutes, but a simple rubber band to keep them together in your gym bag is fine.

Cards in action: from my latest workout:

This DIY is so odd and cheesy, I almost didn't share it. I made my cards on a whim, not knowing if I'd ever get any use out of them. However, I've actually found them pretty great, especially for those days when I'm sore and tired and just don't feel like working out, or during those last 15 minutes when I'm sprinting toward the finish with no energy stores left. I see these little messages, and I push a little bit harder, go a little bit further, and kick a little bit extra ass! So I decided to share them anyways, in all their crazy, cheesy glory, and they just might help motivate someone else as as well. 

Monday, June 11, 2012

Road Trip Menu - Post-Trip Notes

This was our first Road Trip where I made ALL our meals and snacks, and I've been sharing the recipes all week. To finish the series, I wanted to share how it went. Our Road Trip began with a 12hour+ drive to Utah, where we stayed for a few days for business, before we continued with another 8 hour drive to Yellowstone, where we stayed for 3 nights, before driving back home. We were gone a total of 1 week.

Again, here is my healthy Road Trip Menu, complete with recipe links:


Road Trip Menu:

Snacks:
  • Hummus with veggies
  • Homemade Trail Mix
  • Baby carrots
  • Beef Jerky
  • Homemade dried fruit - recipe here
  • Fruit salad
  • Individually packed watermelon slices
  • Yoghurt
  • Kefir

Ready Meals:

Quick-to-Assemble Meals:
  • French Picnic Baguettes: - recipes here
    •  - Ham & Cheese
    •  - Brie, Walnut & Prosciutto
    •  - Steak & Goat Cheese
  • Homemade Egg Salad and Arugula Wraps - recipe here

Drinks:
  • Unsweetened Ice Tea


Road Trip Menu: Success or Failure:

For our driving days, I packed our cooler full of the Snacks and the Ready Meals, so that we could avoid fast food, junk, and soggy gas station sandwiches, without having to stop to prepare food. It worked brilliantly. We ate Salad in a Jar, Ham, Turkey & Dijon Wraps and snacked on watermelon and carrots with hummus during the drive. When we arrived at the hotel late that night, we had the Pesto Pasta in a Jar for dinner, and fruit salad for dessert. 

While were stayed at the hotel in Utah, I restocked our groceries, and replenished our stash of Ready Meals for our drive to Yellowstone. I also prepared all the components for the Quick-to-Assemble Meals, so we would have some great meals while inside the park.  Last time we went to Yellowstone, we were stuck eating the park food, which honestly is absolutely HORRIBLE (if you're going, beware!), and that was not something I wanted to do again. Instead, on this trip we had delicious, varied picnics in the park every single day (including one day when we ate in the car while stuck in a sudden June snow storm!) and tasty dinners in our room each night. For our 1000 mile drive home, I once again spent a few minutes whipping up some wraps for the road. We also snacked on dried kiwis & beef jerky. 

By planning ahead, carefully picking my recipes according to the needs of each day of our trip, and doing a little bit of food preparation daily, I not only managed to feed myself according to my diet goals, but also feed my hungry Hubby food that he enjoyed, and that kept him satisfied. For the first time we managed to completely avoid unhealthy food options throughout an entire Road Trip, while also saving us time on long drives.

Overall, it was lovely. The food was delicious, healthy, fresh tasting and so easy. I was so happy my plan worked PERFECTLY! Even better, The Husband was majorly impressed, which alway makes me happy! When we arrived home, I'd had actually made PROGRESS on my fitness goals (woooohoooo!), instead of taking steps back. I'd call that a success. 

Sunday, June 10, 2012

Road Trip Recipe 6: Egg Salad and Arugula Wraps

Traditional egg salad is often made with lots of mayonnaise, which makes it really heavy. To make it healthier, I make mine with Greek yoghurt and a just a tiny bit of mayo, and you can't even tell the difference. Usually, I make this egg salad when I make finger sandwiches for Afternoon Tea, but it's also really tasty in wrap form. Sometimes I flavor it with mustard, or green onions, and always with sprouts if I make tea sandwiches, but this is the base recipe. 

Since it's so easy to make, and keeps well for a couple of days if it's stored properly, I added it to my healthy Road Trip Menu. Instead of bread, I used whole wheat sandwich wraps, and these made for a great lunch for us on our trip to Yellowstone. Instead of eating the horrible park food we were stuck with last time, this time Hubby & I are having picnics in the park every single day, and it has been so lovely. Just as with yesterday's French Picnic sandwich recipes, I kept the components separate to avoid sogginess, and it literary took two second to whip these up. 

Quick-to-Assemble Meals:
  • French Picnic Baguettes:
    •  - Ham & Cheese
    •  - Brie, Walnut & Prosciutto
    •  - Steak & Goat Cheese
  • Homemade Egg Salad and Arugula Wraps

Egg Salad and Arugula Wraps with cucumber, tomato, green onion, and carrots.

Egg Salad and Arugula Wraps

Ingredients:
6 boiled eggs, peeled and chopped 
1/4 cup low-fat Greek Yoghurt
1 tbsp mayonnaise
Sea salt
Freshly ground pepper
4 whole wheat Lavash flatbreads
1 cup arugula

Directions:
1. Add chopped eggs, Greek Yoghurt and mayonnaise in a bowl; combine well. 
2. Season with salt and pepper. 
3. Divide egg salad among the wraps, concentrating the egg salad in one end of each lavash. Top with arugula, and roll up, starting at the end that holds the egg salad. 
4. Enjoy right away. Nom nom.

Saturday, June 9, 2012

Road Trip Recipe 5: French Picnic Baguettes

These sandwiches remind me of quintessential picnics in France as a kid, and of generally glorious times spent running around Provence with French friends that I could barely understand.

While they cannot be pre-made for any significant amount of time, due to the resulting sogginess, they can be prepared in parts, stored separately, & then quickly assembled when it's time to eat. I much prefer having to deal with some light assembly over eating old, soggy food. Which is why I included them on my healthy Road Trip Menu for the later part of our trip, for which most of the pre-made food from home wouldn't last. Luckily, after our first day of driving, we had a few nights at a really nice hotel before continuing our Road Trip, so I had a chance to stock up on groceries, do some light cooking (our room had a full kitchen), and prepare new meals for the remainder of the trip. While having a kitchen made it easier, it was in no way necessary - I could have easily done the same thing at a camp site.

Quick-to-Assemble Meals:
French Picnic Baguettes
       - Ham & Cheese
       - Brie, Walnut & Prosciutto
       - Steak & Goat Cheese
Homemade Egg Salad and Arugula Wraps

Just as the previous recipes in my Road Trip Menu series, these can be varied a lot, by what you put in them. All of them can also be made using flatbread wraps instead of baguette. These are three of the most popular ways I prepare mine:

------------------------------------------------------------------------------

French Picnic Baguettes: Ham & Cheese

This classic is the one sandwich of these three that can stand a bit of time in the cooler, fully assembled and just waiting to be eaten, without going soggy right away. However, they are best when assembled right before eating, so pack each component separately, and then assemble the sandwiches on the spot.

Ingredients:

1 long French baguette, cut in quarters and split, OR 4 small, single-serve baguettes, split
1/2 pound French ham, sometimes sold as jambon de Paris, sliced paper-thin
2 tbsp Dijon mustard
6 oz Gruyere cheese, thinly sliced

8 cornichons, thinly sliced lengthwise (optional)

Directions:

1. Spread the mustard evenly over 1, or both cuts of the baguette (traditionally butter is used on 1, mustard on 1, but I usually do mustard on both).
2. Layer the ham slices on the bottom baguette half, followed by the cheese. Top with the cornichons, if using.
3. Press sandwich together, and enjoy!

------------------------------------------------------------------------------


French Picnic Baguette: Brie, Walnut & Prosciutto

This is a delicious combination, with variations mentioned below.

Ingredients:

1 long French baguette, cut in quarters and split, OR 4 small, single-serve baguettes, split
Brie Cheese
1 pear
1/2 pound Prosciutto
1/4 cup Walnuts (toasted)
Extra-virgin Olive Oil
Balsamic Vinegar

Directions:
1. Drizzle baguette with olive oil and balsamic vinegar.
2. Spread a layer of cheese over baguette, and top with prosciutto.
3. Slice the pear very thinly, and fan over the prosciutto. Sprinkle with walnuts.
4. Enjoy!

These are also very nice topped with arugula (I know, I know, I seem to put arugula on everything). Also, the prosciutto can be omitted, and honey can be used as a spread instead of the olive oil and vinegar mixture, for a very tasty Brie sandwich.


-----------------------------------------------------------------------------


French Picnic Baguettes: Steak & Goat Cheese

I usually make these either using leftovers from grilling the night before, OR I grill the meat while I grill something else for dinner the night before, then cool and slice it right away. This time, since I made these in my hotel room kitchen, I seared the steak instead. You can use many different cuts of beef, and in a pinch you can even avoid cooking altogether, and use roast beef from the deli counter instead, although it really tastes the best with freshly grilled steak.

Ingredients:


1 long French baguette, cut in quarters and split, OR 4 small, single-serve baguettes, split
1 large red onion, thinly sliced
1/2 cup of water
1/2 tbsp butter
1/2 tbsp extra-virgin olive oil
1 pound grilled beef steak, of desired cut, seasoned with salt and pepper to taste
5 oz fresh goat cheese, room temperature
1/4 cup grainy Dijon mustard
2 bunches arugula, stems trimmed


Directions:

1. Slice steak thinly, against the grain, and set aside.  
2. Melt butter with olive oil in a skillet over medium heat. Add onions, and caramelize, adding water in small amounts as needed. The onions are ready when they are a deep, golden brown, very soft, and sweet. For our Road Trip I made these the day before, and they store well when refrigerated.
3. Dividing evenly, spread top halves of bread with cheese, and bottom half with mustard. Add steak, onion, and arugula. Season to taste if needed.
4. Enjoy!


As with the other two sandwiches, I packed all the components separately in the cooler, and then assembled the sandwiches right before lunch. 

Friday, June 8, 2012

Road Trip Recipe 4: Pesto Pasta in a Jar

These awesome Pesto Jars are another ready-to-eat meal from my healthy Road Trip Menu, and it's one of my husband's favorite picnic dishes. They can also be made in a big batch and kept in the fridge, for a quick, tasty and portion controlled meal that doesn't taste like it spent the last 2 days in your fridge.


Ready Meals:
Salad in a Jar
Ham, Turkey & Dijon Wraps
Pesto Pasta in s Jar


They are delicious warmed, but it's also tasty cold (if you're into that sort of thing). I added it to this list since it lasts so well throughout the day. In fact, although I made this the night before we left, we still were able to have this for dinner almost 24 hours later, and it was still fresh and absolutely delicious. I have also made more of these yesterday in our hotel room (which had a full kitchen), as well as more salad jars, and more wraps, to eat on the remainder of our Road Trip. We're continuing to Yellowstone today, so these will once again be great for our drive.

Pesto Past in a Jar - quick, easy, portable, and super tasty!

Pesto Pasta in a Jar

Ingredients:

2 cups cooked pasta of choice
2 cloves of garlic
1 1/2 cup fresh basil leaves
1/4 cup extra-virgin olive oil
1/3 cup parmesan cheese
1/4 cup pine nuts
1/4 tsp sea salt
1/4 tsp freshly ground black pepper

hot water, as needed

1 cup arugula lettuce (optional)

Directions:

1. Cook pasta to al dente, and drain. Cool to stop cooking, and set aside.
2. In a food processor or blender, combine garlic, basil and olive oil until smooth. Add cheese, season to taste, and mix briefly. Add hot water, as needed, until desired consistency is reached. Do keep in mind that if you are planning on eating this dish cold, the pesto needs to have a bit more fluid consistency than if you're heating it. Of course, as an alternatively, store bought pesto can be used.
3. Spoon a layer of pesto into the bottom of each mason jar.
4. Add cherry tomatoes, season to taste, and sprinkle with pine nuts.
5. Topp each jar with pasta, and, if using, the arugula.
6. Shake right before serving. Enjoy!

This recipe can be modified in many different ways by adding mozzarella cheese, grilled Italian style veggies, Portabello or button mushrooms, and a large variety of protein. Chicken works really well, as do grilled shrimps, although depending on what you add, the dish might stay good for less time. I just made this basic recipe, and had one for lunch yesterday, on the 3rd day since these were made, and guess what? STILL delicious! That is crazy awesome, people!

What do you put in your pesto?