Showing posts with label Redo/Redux. Show all posts

Sunday, June 24, 2012

Redux: "Quicky" Yard Panel Baby Blanket

I made another baby blanket yesterday, using the same yard panel as my first Quicky Baby Blanket tutorial, but in pink this time.

Pink Yard Panel Baby Blanket

I did change a few things, compared to last time:
           1. moved the location of my label, from the binding, to the body of the quilt.
           2. quilted the background in diagonal stripes

Image source: my Instagram

           3. this time I tried rounded corners, and used a very skinny binding, a left-over from another project

Rounded corners, skinny binding
         
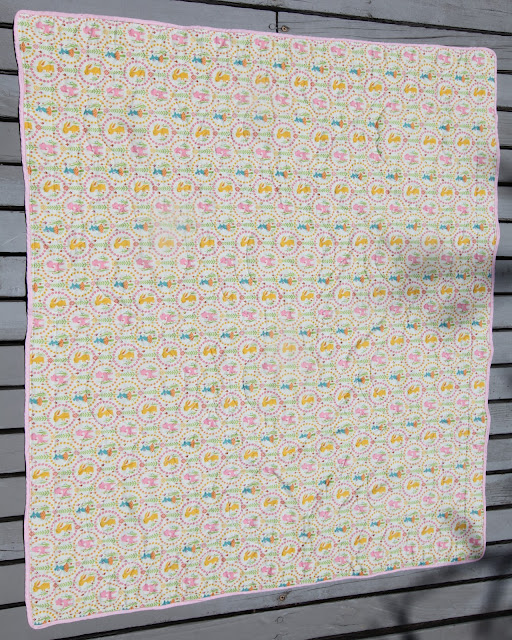
              4. a different, but still coordinating, backing print

 Quicky Yard Panel Baby Blanket backing

Overall, I'm pretty happy with this blanket. It is very light, but still cuddly. It took a little over 2 hours to make from start to finish, and only that long because of the added trickiness of working with such a slim binding. While I might try the rounded corners again, I'll definitely stay away from super skinny binding in the future. So not worth the effort, but it worked well on this light little blanket. I sent it off with a set of my Month-to-Month Onesies, and together they will hopefully make a great, useful gift.

Fabrics:

Top:
1 yard (Yard Panel) Sheri McCulley Studio, Woodland Tails, Panel Pink

Backing:
1 yard Sheri McCulley Studio, Woodland Tails, Friends, Green

Binding:
pink bias cut binding - left over from another project

Sunday, February 19, 2012

DIY Project: Chalkboard Mustache Mugs

After I made the Valentines-themed heart mugs last week (& gave them all away), I've been thinking of a million different variation of that project. For me, this mustaches-themed version was the obvious choice for which one to try next.


I made each mustache a different shape & a different color, to help everyone keep track of which mug is theirs. And if that wasn't enough, I also make the paint into homemade chalkboard paint, so mug-chuggers can scribble their name on their mustache, using chalk. Try losing your cup in the crowd now!

I really love how these turned out. They look hilarious on their own, and even funnier when you drink out of them. They are also really useful when having guests over. I used more of my new favorite, over-sized mugs for this project, and they hold a massive 20 oz of drink. Equally perfect for coffee guzzlers & lazy pants alike.

I took a few more pictures this time, to go along with the instructions:


What's you'll need:
China paint (see images 1, 3 above)
China paint thinner (see image 1 above)
White-Dry non sanded Grout
Paint brushes
Exacto knife (see image 2)
Pen
Stencil material - I used Avery label paper (see image 2)
Oven-safe ceramics of choice
Mortar & pestle (see image 5)
Paint tray OR paper plates (see image 6)

Optional: bamboo sticks

What to do:
1. Assemble materials. (Duh.)
2. Create your stencil. I drew one side on my label, freehand, and then folded the label laterally, to create the other half, to match the first (see image 4 above).
3. Cut out your mustache stencils using the exact knife.
4. Apply stencils to mugs (see image 7), making sure the position of each mustache is fairly consistent throughout all your mugs.
5. Add some grout to your mortar & pestle, to remove all grout clumps (see image 5). This is a new step, compared to last time. I hoped this would decrease the number of stubborn grout clumps that I couldn't quite get rid of last time. I pestled the grout into a fine power, and it actually worked pretty well.
6. Prepare chalkboard china paint, by mixing paint with a small amount of grout, estimating the ration of 2 tablespoons to 1 cup of paint. Stir until smooth, & add a few drops of thinner if the paint dries out. Initially, I used a paint tray to mix my paint and grout, stirring with bamboo sticks (see image 6), but it was really difficult to get a smooth mixture. So, this time, I switched to pouring the paint on a paper plate instead, and then dusting with grout on top (you don't need that much), and that proved to be a far superior way to get a smooth chalkboard paint mixture (see image below).

Much better.

This method change made a big difference. The paint was much easier to apply evenly, without leaving brush marks, an the finished mustaches were much smoother, but still fully functioning as chalk board.
7. Let paint dry (photo 8) & then add a second coat. Let dry.
8. Remove stencil (see photo 9), and, if needed, correct any leaking paint smudges. I used a sharp tip of a bamboo stick to do small touchups, and they were perfect for the job.
9. Let dry for 24 hours.


10. Preheat oven at 300 degrees F. Cure ceramics in oven for 20 minutes, or according to directions on your paint of choice.
11. Let cool.

Mission "Mug O' Mustache" accomplished! (I totally realize it is completely ridiculous that I would call it that, but I couldn't resist.)

Now, come on over for a drink! Image Source: My Instagram

"Coffee? Tea? Milk or Sugar with that? And... which mustache?"