Showing posts with label Decor. Show all posts

Monday, December 2, 2013

DIY Project: Kitchen Island

My finished kitchen island fits right in to my kitchen.

I used these free Ana White 'Easy Kitchen Island' plans for this project, with a few small adjustments. This is the second time I've used plans from Ana White's site, and just like last time, they were brilliant! They just makes a project like this so easy! I just emailed the plans to myself, they included both a shopping list and a cut list, and headed to my local home improvement store for the necessary supplies.

Supplies, waiting to get cut.

I had most of the wood cut in the store, according to the cut list. I did end up getting a Kreg jig, something that is recommended in the instructions but that I initially though I'd skip. In the end, I'm really glad I got one, as it helped make the assembly really easy, and it will be very useful for future projects. Thanks to the Kreg, the whole piece came together start to finish in half a day, the constructed kitchen island is very stable, and all screws are completely hidden out of view.

Shelf assembly. 

I did make a few, small alteration from the original plans; I used 2x4s for the shelf support beams, for sturdier shelves, which I know will have to carry a lot of weight; I added a few inches of length overall in the bench top; I used wider boards for the bench top than the 2x6 recommended in the plans. Besides those alterations, I made it exactly after the specifications.

For the finish, I sanded the entire island, stained the top and the shelves a dark brown, and painted the base and the legs with a couple of coats of white. I topped it off with some polythyrene for shine and durability, as I wanted to be able to wipe it down.

Kitchen island, completed, waiting to dry.

It's not perfect, and noone will mistake it for a store-bought piece, but I'm actually really pleased with this project. It has vastly improved my kitchen! Previously, we had this tiny, much-too-llow, old and dingy butchers block in the center of our kitchen (that came with our rental house), and the only storage for pots and pans was the very limited space under the stove.

Shelves, shelves, and more shelves!

Now I have this massive work surface, at a great hight, plus two large shelves for storage of pots and pans! Finally, I have enough space for both cooking and storage, and the daily tetris-game of stacking pots under the stove, that used to take place each time I needed to cook, is over once and for all. I only wish I would have completed it sooner.

Cooking a massive holiday dinner was a breeze this year,
 all thanks to my new kitchen island! 

This project has taken me all year to complete, for no real good reason. I started it way back in January, and it's been put on the back burner many-a-times throughout the year, in favor of other project. I'm so happy to finally have it completed (I hate having unfinished work laying around), and I'm stoked to use it during the holiday cooking season!

Actual work only took about 3 days; one day get and cut supplies; one day for the build and sanding; and one for the paint job, with a couple of hours of actual work each day, and about $120 in supplies. Not bad for a brand new kitchen island! In addition, skill wise, this project was easy. I was able to do it, on my own with no problems, and I have absolutely zero experience doing something like this.

Kitchen island in use during the making of this year's Thanksgiving dinner.

Thanks, Ana, for the awesome project plans!

Cost:

$122.11 in materials
~ 6 hours of work + drying time

 The kitchen island added a perfect work space to my otherwise pretty crappy kitchen.

Monday, January 14, 2013

DIY Project: Fabric Wrapped Pin Board with Nail Trim

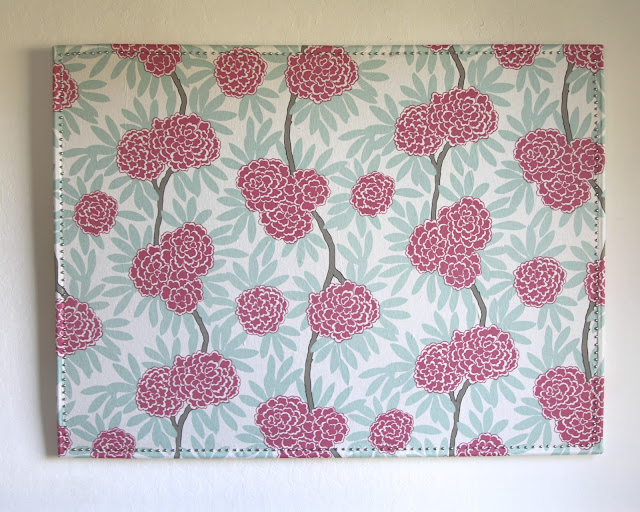
I made this for my office, having recently seen something similar on Pinterest. I used this gorgeous Mint Fleur Chinoise upholstery weight fabric, left over from my chair makeover, for my pin board, and silver tone upholstery nails for the trim.

My massive pin board via my Instagram

I love this print so much, I was stoked to have enough left over to cover my pin board! 

Fabric Wrapped Pin Board with Nail Trim

What you need:
1 cork board
fabric to cover cork board with a few inches to spare
nailhead trim
adhesive spray
stapler


What to do:
1. Iron your fabric thoroughly.
2. Adhere fabric to your pin board, using the spray adhesive. Start in one corner, and work your way across, making sure the fabric is completely smooth everywhere.
3. Line rim/frame of pin board with nail trim (my least favorite part of this project - it's quite hard on the fingers/thumbs). Make sure you place the nails straight, and with equal distance all the way around.
4. Flip board upside down, wrap the fabric around the edge/frame, and staple the fabric securely to the back.
5. Done!


This is such a quick, easy little diy that makes such a big difference! Now my pin board actually adds to my room decor, instead of being a boring, brown eyesore.


Materials:

1 yard Caitlin Wilson Mind Fleur Chinoise fabric
300 upholstery nail trim nails
adhesive spray glue

Friday, January 11, 2013

DIY Project: Reupholster Chairs

My husband have had this table and chair set for eons. While they might not be my particular style, they are high quality and in fairly good condition. The fabric on the chairs seats , however, have started showing major signs of wear. As we currently rent, we haven't been in any hurry to replace them. Instead I've been thinking about redoing them myself for quite a while, and finally took the plunge. I've never done any furniture reupholstery before, but it was easy enough. I improvised the process, taking notes as I took the chairs apart, and then put them together again in the reverse order. Piece of cake!

Chairs, Before

I got a bunch of amazing Caitlin Wilson pillows when I redid my office last year, and ever since, I've wanted to use this gorgeous Mint Fleur Chinoise print to reupholster these chairs. Finally, finally, I pulled the trigger and ordered the fabric, in spite of its $60/yard price tag.

Source: Caitlin Wilson Textiles

I've been waiting for the fabric to arrive for what feels like eons, which makes me feel like I've been working on this project for weeks, when I in fact have not. Luckily, when the fabric actually got here, the project took about an hour and a half from start to finish, which isn't bad given the fact that I had absolutely no idea what I was doing. Here are my "new" chairs:


Chairs, after

I'm so glad to finally have this project completed, and I love, love, LOVE how they turned out! They've brightened up my little kitchen nook so much! I find myself repeatedly walking through the kitchen, for no reason other than to admire my pretty, new chairs.

Before/After

Fabric:

2 yards Caitlin Wilson Textiles Mint Fleur Chinoise, $120

Thursday, January 3, 2013

DIY Project: Pom Pom Garland

I've seen pom pom garlands all over the place lately, and as I love pom poms, I've been dying to make my own for ages, to decorate the rack of the faux taxidermy deer head in my office. The other day, the massive bag of Pom Poms I ordered online finally arrived on my door step, and I made this garland this morning.


DIY Project: Pom Pom Garland

This project is super easy, very fast from start to finish, and so so cute!

What you'll need: 
pom poms
string, yarn, or fishing line
embroidery needle

You can use any type of pom poms for this project; felt, yard, or "fuzzies" like these.

What to do:
1. Starting 12 inches from one end of the string (or however long you think you'll need to attach the garland when using it), start adding a pom pom by spearing through it with your needle and thread. You can knot the thread around each pom pom, but if they sit fairly snug on the string, like min did, there's no need.
2. Repeat step 1, for however long you want your garland, adding another, and another, leaving a suitable space between each pom pom. Leave extra string on the other side as well.
3. Done!

I used an embroidery needle to make my garland, which worked well, but regular sewing needles would also have worked.

Perfect for holiday or party decor, or to spruce up a faux taxidermy rack. I also have tons of left over pom poms, and several other pom pom projects coming up!

 via my Instagram

I love my little pom pom garland! It fits in perfectly in my office!

Wednesday, December 5, 2012

DIY Project: Felt Christmas Tree with Ornaments

I got this idea from Pinterest (of course) months and months ago, and while there are countless versions of this project out there, I really like this tutorial from the blog Johnny In A Dress.

As soon as I first saw this, I thought of a certain little Swedish girl, who I knew would LOVE something like this for the holiday season. But the holidays were still very far away at the time, so I filed it away for later in the year.


I finally made this project this week, and the whole thing took about 30 minutes from start to finish! All you need is about 1 yard of green felt, plus some colored felt for decorations, a scissor, and hot glue.


Unlike the original tutorial, I used a mix of plain and patterned felt, instead of decorating the ornaments myself. I also hot-glued a star to the top of the tree.


I added a couple of gift tags to some of the gifts under the tree, one with the gift-recipient's name, and one with "God Jul", which is Swedish for Merry Christmas.


I also added one gift with an unsealed top edge, to use as a pocket for the ornaments when not in use.


I attached the tree using wide, double-sided tape, and it worked brilliantly.


I hope this little felt tree will give a certainly little girl, who according to her mom "likes to re-decorate the tree every single day", a lot of joy this holiday season.

Saturday, December 1, 2012

DIY Project: Winter Holiday Banner (Retail Knockoff)

I saw these adorable Kata Golda Winter Holiday Banners on Gilt the other day, for $100, discounted from the original $140. First I thought "Cute!", followed by "$100 for $10 of felt?!?". But... but... this thing is a perfect match for my Holiday decor! It would look so cute in my house!!! However, while very cute, it's worth nowhere near $100. So, I tried to make something similar myself.

Image source: katagolda.com


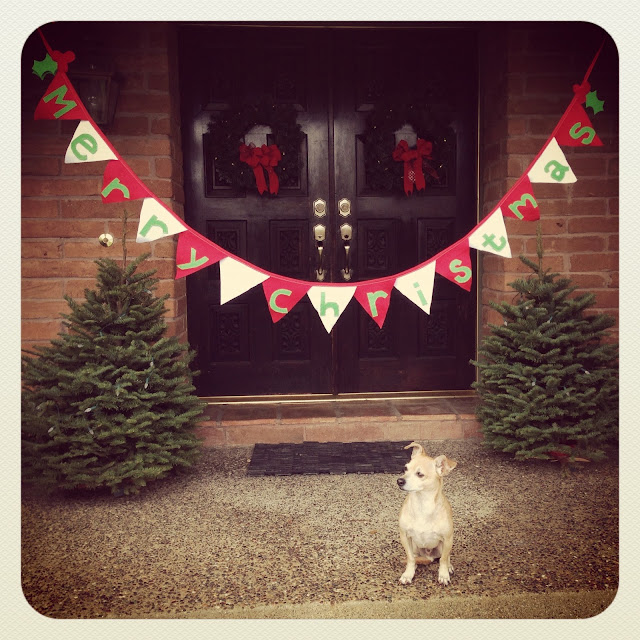
This is what I came up with.

DIY Project: Winter Holiday Banner Tutorial (Retail Knockoff)

I used the original specifications as a guide. Pennants are 7"x7", spelling the words "Merry Christmas" with one blank pennant included to create a space between words. Length is 86" plus an extra 32" of twill tape for hanging on each end.

What you will need:


White felt
Red felt
Light green felt
150" 0.75" twill tape, natural (I used red because I had some, but if I did another banner, I would make sure it was natural, or white instead)
Sewing machine with matching thread OR hot glue gun
apple green embroidery thread and needle (optional)

What to do:

1. Cut 8 red 7"x7" felt pennants, 7 white 7"x7" pennants, and 14 3"x3" squares of the apple green felt.


2. Cut out your letters from the light green felt squares, freehand or use a pencil to trace them first. Also cut out 6 green holly leaves, and 4 copies of the three red berries (or however many you would like, I made a few less than the original).


3. Attach letters to the pennants. The original banner have the letters attached by hand stitching, using a matching green thread, and they may or may not have been glued on first. You can either hot glue the letters in place, or attach them using a sewing machine, and then adding the green stitching afterwards, alternatively, just doing the hand stitching. I felt a bit iffy about the quality & longevity of my hand stitches, so I machine-stitched mine first. Remember to leave one blank pennant to create a space between the words.


4. To attach the pennants to the twill tape, lay your tape out on a large work surface, and measure 33" from one end. Place your pennants in the proper order, overlapping slightly (around 1") with each one. Don't forget the blank pennant between the words. For the original look, fold the pennants over the twill tape and zigzag over the fold. If you're using bias cut tape in place of twill tape, like I am, instead fold the double folded tape over the edge of the pennants, and attach either by matching stitching across each pennant on the twill tape (like the original), or, by using a hot glue gun.


5. Assemble your leaves and berry pieces for the decor, and lay them back to back, with the tape in the middle, on either side of the letters. Hand, machine-stitch or hot glue the berry decor onto the twill tape, one on each side of the pennants. I machine-stitched the berry pieces together over the tape, with the leaves in between.


6. If you want the same finish as the original, hand-stitch the light green embroidery thread around all the letters. This step isn't necessary, obviously, and it takes this project from a quick 30 minute project to a rather time consuming endeavor. In this case, the extra work is actually worth it, and the hand stitches add a really nice touch. While my banner looked fine before the stitches, it looks fantastic with them!


7. Voila! While my banner has slight differences from the original, and my photo isn't quite as fancy, in person they are actually very similar, and I'm very happy with my little holiday banner. It's very festive!


Cost Comparison:

Original:
$140, through Kata Golda website, or $100 at Gilt

DIY Retail Knockoff (generous approximation, since I had the supplies left over from previously projects): 
Felt: $5
Twill tape: $5
Embroidery thread & needle: $5
Total: $15

$15 compared to the original $140! Not a bad "retail knockoff". This project can be altered to fit any occasion, and I'm making a 'Happy Birthday!" one next. Of course, I'll post photos when it is finished.

Wednesday, May 9, 2012

Welcome to my new office!

Finally the day has come to reveal all the changes I've made to my office! Although I finished it several weeks ago, we've have had guests staying here until recently, so the reveal had to wait. I really do love my new office so much! I frequently find myself wandering in there just to look at it. It's pretty, but even better -- it's pretty AND functional. Let me show you around.

Office accessories

My old office was a complete bit of a bore. It was all about work, work, WORK and I never took the time to actually make it into a beautiful space. This time I wanted more glamour, less clutter. More style, less school. More inspiring, less snoring. Or maybe more snoring, technically, since I also wanted it to double-duty as a guest room.

You get the point. I wanted a lot more from my office.

Since I didn't take before pictures, I can't unfortunately show you what this space used to look like. Just know that it was ugly and really boring. Most of the space was dominated by two very large desks, which were really practical when studying. However, since I'm no longer in school, I didn't need that figuration anymore, so the first thing I did was tossing out those massive desks. I replaced them with a small Ikea desk.

The new desk & footstool.

I turned the new desk at an angle against the Ikea Expedit that I already owned, to create a smaller, more confined "office corner" in the room. My bamboo chair mat frames the space perfectly. This new, smaller desk space is perfect for writing, which is mainly what I do at my desktop nowadays, without eating up the entire space. The Expedit cubbies hold everything from my ever-growing collection of writing research books, to Baby Cat's electric cat bed.

The office corner

Behind my desk I wanted a gallery wall with a mix of pictures of family, friends, and pets, and I ended up adding a few mementos as well. I also removed the old, ugly, light-sucking curtains that previously dominated the small, off-center window on the one side of my desk. A large, flowering bush (with delicious smelling flowers) grows right outside my window, and together, the curtain and the bush made this room really dark. I replaced them with sheer white curtains, which made such an enormous difference! I also added blackout curtains, to accommodate overnight guests.

Gallery wall & double curtains 
(if you look closely, you can see that some of the frames are still waiting for their photo)

Since we rent, I couldn't paint the walls a nice, new color. I was kind of bummed about that, until I found these colorful vinyl dots from Blik. They are removable, easy to apply, cheap, and they bring such a great pop of color to my otherwise boring white walls.

Wall dots, from the door.

Against the wall opposing my desk, I have my brand new daybed, fitted with a 10-inch thick twin-size memory foam mattress. Underneath it is the trundle that I built, fitted with a 5 inch (originally a 6 inch, but I trimmed off 1 inch for clearance) memory foam mattress, to add one more twin guest bed to the room.

Other side of office, from window.

I originally added the daybed to my office to gain a part-time guest room, and I had not anticipated the amount of additional use I've gotten out of it since I got it.  I read on it, I nap on it, I turn my computer around & watch TV on it, I sleep on it when my husband's snoring makes the master bedroom unbearable (only once, as of yet, but give him some time). Hubby have napped on it during the day on occasion as well.

 Daybed & DIY trundle.

I wanted to pile the daybed high with awesome pillows, but I had no idea how hard it would be to find suitable pillows! After a lot of work, research, DIY-ing, and a few failed internet orders, I've finally arrived at an acceptable state of pillow bliss.

A mix of vintage, store purchased, homemade, and custom Etsy ordered pillows

As a coffee table, I use this little rolling glass side table from Ikea. When I don't need it, it conveniently tucks right in under the desk. This works out wonderfully, as I can easily clear this space when I need to use the trundle. I just roll the table in under my desk, right next to my foot stool, and the trundle pulls right out.

 
Side table rolled in under the desk

Both daybed & trundle made up for sleeping 2 people
(as it turns out, snapping pics in the middle of the night do not produce the best picture)

This also allows me to use this flexible space to craft in my office. Previously, I used a foldable craft table in another part of the house, but the light was really bad. Now, I can easily clear this space to fit my craft table, which allows for more light for me while I work, and less clutter in the rest of the house. Major win-win. Or, more like win-win-win. Win.

Foldable craft table & sewing setup - I can even turn my desktop around & watch TV while i work

On the small sliver of wall between my closets, I used to have a system of whiteboard calendars, where I kept my school schedule. Now I have this 6 drawer tall dresser from World Market, and I really love how much extra storage it has added.

New tall dresser

And that's the tour! (I'll be seriously impressed if you made it this far though this longwinded post.) All the big things, at least. I'll post a more detailed look at some of the smaller features another day.

Faux-taxidermy deer head

All in all, I'm extremely pleased with my new, multitasking space!  Most of all, I'm so happy I finally took the time to truly make it my own.