Showing posts with label Quicky DIY. Show all posts

Monday, February 11, 2013

DIY Project: Pet Pod Blanket

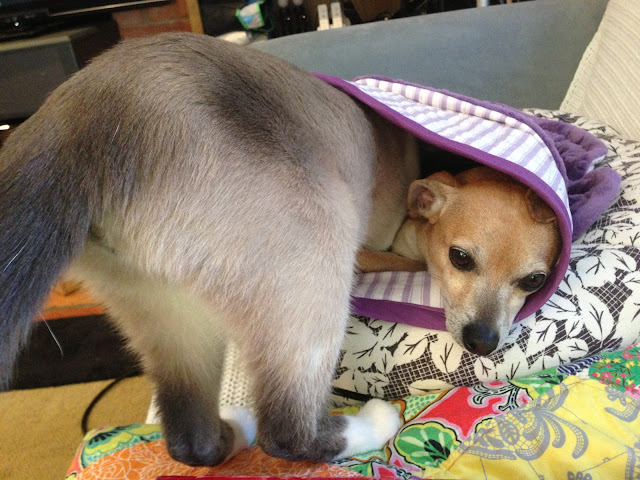
My dog likes to get covered up in his bed, preferably so only the tip of his snout peaks out. I designed and made him this "pod blanket", to help reduce his frequent blanket frustration, when he just can't get his bedding organized properly by himself. We frequently "tuck him in", but I was hoping this little burrowing blanket would help him get comfortable when we're not around to help him.

Still having some doubts about this strange blanket.

This blanket consists of a quilted blanket pouch, or pod, in a mix of cotton, batting and minky fabric, it is quilted, with a funnel at the opening, that stays open, to help keep the pod easily accessible. It fits perfectly in my dog's beloved donut bed.

Finally enjoying his little burrowing pod blanket.

I made this blanket yesterday morning, and while it didn't take very long, it actually proved too much for my little sewing machine, and right as I finished the project, it broke. I'm glad I got to complete the project before my machine quit on me, but I have several other projects in the works, that now need to wait until it is fixed to be completed. To add insult to injury, when I first showed my dog his brand new, awesome, sewing-machine-breaking blanket, he hated it. Literary wanted nothing to to do with it. 

Eventually, after trying this suspected torture device for a little while, he seemed to grow to like it. Then the cats discovered it as well, and suddenly we were dealing with Pet War 1 for the rights to the pod blanket. 

 The more the merrier!

While it's really hilarious to see them bicker about who gets to use it, I'm just glad that it actually is getting some use. Initially, when it was hated by everyone, I was afraid it would end up collecting dust in some closet. 

My cat LOVES the pod blanket!!!

Thursday, February 7, 2013

DIY Project: Bunting Garland Photo Prop

I made these bunting garlands to use as photo props for an upcoming photo shoot with my baby niece, but of course, it could just as well be used as decor for a nursery, as a party prop, or whatever else that could benefit from the addition of a charming little banner.


This is a very simple project, similar to my Retail Knockoff version of Kata Golda's Winter Holiday Banner, but this time in cotton fabric instead of Felt. I made a few different versions.

DIY Project: Bunting Garland Photo Prop

For one banner, personalization optional.

What you need:

Cotton fabric in coordinating colors for 15 bunting flags
3 yards twill tape, binding, twine, or ribbon

optional: contrasting fabric for letters

What to do:

1. Cut 15-ish bunting flags of desired shape and size.

from my project sketch  

2. Serge or zig-zag around the raw edges of each flag, to prevent unraveling, or leave them raw, depending on the look you want. Alternatively, cut twice as many flag as needed, and place them in pairs, right side facing, and sew around the hanging sides (not the one that will be attached to the twill tape), then turn right side out and press.

3. Optional: spell a name or greeting by cutting letters of contrasting fabric and sew onto banners. If spelling several words on one banner, leave blank banner as divider between words. IF using a two layer method, add letters BEFORE pairing to hide the seams.

Two double cloth banners, one with closed seams, one with edges left raw.

4. IF using twill tape, space your flags onto your twill tape, either by overlapping, edge to edge, or spaced a couple of inches apart. Fold pennants over the top of the twill tape and sew across to secure.
IF using biascut binding (which is great for banners), just stick your flags inside the fold at desired distance apart, and sew across to secure. Remember to leave approximately 10 inches spare length of tape at each side of the flags for hanging.

Bias-cut binding is perfect for bunting garlands! Stick the flags inside, and secure across the top.

5. Your banner is done!

3 different size & shape bunting garlands, to be used as a photo backdrop.

Friday, February 1, 2013

DIY Project: Quilt Carry Strap

This Quilt Carry Strap is of my own design. In fact, I dreamt I made this exact strap last night. I woke up with the design on my mind this morning, and quickly scribbled the idea down on the note pad I keep by my bedside table, for instances just as these. I got up, and put this together. I wanted to see if this would actually work as well in reality as it did in my dream.


Good new! It works! This little Quilt Carry Strap is super easy to make, simple to use, can be made to fit a specific size quilt, or it can, like this one, be adjustable to fit any size. It makes any quilt easily portable, simultaneously keeping it compact and contained, while also supplying a comfortable carrying handle for sensitive hands. It can also be used with a shoulder strap. All without attaching any straps, or handles, to the actual quilt. And it took 20 minutes to make.

Thick, padded carry handle for my sensitive hands. 
And, of course, I had to add one of my fabulous labels.

To carry a quilt using the quilt strap, just fold the quilt lengthwise into thirds (or suitable size, depending on size of quilt), and roll it into a tight roll. Wrap straps around the quilt roll, making sure the handle piece is positioned flat in between them, and then secure straps through the metal loops, and tighten. Repeat with remaining strap. Now the quilt can be carried securely using the handle, or by attaching a shoulder strap.

Quilt strap in action

I did not make a tutorial yet, as there are still plenty of room for improvements. For one, I want to make it in a heavier webbing, and use larger, easier hardware. Perhaps even snap latches. I'll post a tutorial as I've figured those things out. So, while it's not perfect, as a first try, I'm quite happy with this project. I actually used it yesterday, and that made me even happier with it. No more tied-together-with-rope, stuffed-into-bags, or worse; loose, quilts in my car on the way to a picnic or a day at the beach.

Contained, portable, and hand-friendly, thanks to the Quilt Carry Strap.

Wednesday, January 23, 2013

DIY Project: Safari Cheater Quilt

Cheater quilts. Sounds awful, huh? But these cheaters actually pretty awesome. Covered in neatly printed patch work of all of the prints offered in the collection, ready for you to just quilt, and pretend you pieced the whole thing. Cheater. Cheater! CHEATER!

Crib-sized Cheater quilt

This makes cheater prints the perfect first quilting project, as they allow you to try your hand at making a quilted blanket, without having to invest the time piecing the quilt top. Paired with fusible batting, which eliminates the need for using a time consuming basting stitch, spray or pins on your quilt sandwich, this project literary consists of alining and ironing your layers together, followed by quilting, and lastly, adding the binding. Easy as pie! So, if you've been thinking of trying your hand at quilting, get some cheater print and give it a go (why yes, Cate, I'm talking to you)!!!

Close up of quilted cheater quilt top

So, when it all comes down to it, a Cheater Quilt really is just another variation of my panel quilted blanket, and that was the look I was expecting. I didn't think it would end up actually looking so quilt-y. But see for yourself. It actually looks really good. And what's even better? This crib sized, 2 yard, cheater quilt took me about 4 hours to make start to finish (including making the binding). Not bad.

 Coordinating print for the quilt backing

I quilted the blanket in a grid pattern that followed the patchwork of the cheater panel, but instead of one line on each side of a patch seam, as I would normally do using this quilt pattern, I made 3 lines this time. One on each side, and one in the middle, simulating the seams of a real patchwork quilt top. Of course, this added some time to the process. A simple grid would have been a lot quicker, but I like the look of this, especially on the cheater panel.


I used a coordinating print from the same collection for the backing, and a matching white solid for the homemade binding.  I added one of my labels, and done!

Fabric:

Quilt top:
Dan Stiles for Birch Fabrics Organic, Safari Soiree, Cheater

Backing:
Dan Stiles for Birch Fabrics Organic, Safari Soiree, Polka Dance

Binding:
Birch Fabrics Organic, Solid, Cream

Monday, January 21, 2013

DIY Project: Reusable Shopping Bag

This project started as something else, a beach bag, but I wasn't very happy with the end result. Not because this bag isn't nice, it is plenty nice. It just didn't turn out like the idea in my head. I hate when that happens. I was my mistake. I didn't use a heavy enough canvas, and I didn't use a stabilizer to make up for it. So instead of the stiff, standing beach bag I wanted, I got a flimsy, foldable bag, and thus my project was failed.

Then I thought "it won't make a great beach bag, but it would make a great shopping bag". And with the parameters changed, the project outcome changed, and I went from being unhappy to very happy with this project. So, I give you my brand new, accidentally made, enormous Reusable Shopping Bag:

Shopping bag with internal pocket and key fob.

It has wrap-around straps for strength and durability, French seams throughout, an inside pocket, a key fob, and padded strap handles. I used a light canvas in gray and white chevron, paired with a light aqua lining. The bag measures 22" by 18" by 8", but still fold down to a compact little square, perfect to keep in my purse or car, easy to bring to the mall or grocery store.

I like it, and and am glad to add a pretty reusable bag to my collection. I'm even happier to make something that I'll actually use out of a failed project that otherwise would have done nothing but collect dust at the bottom of some closet.

Monday, January 14, 2013

DIY Project: Fabric Wrapped Pin Board with Nail Trim

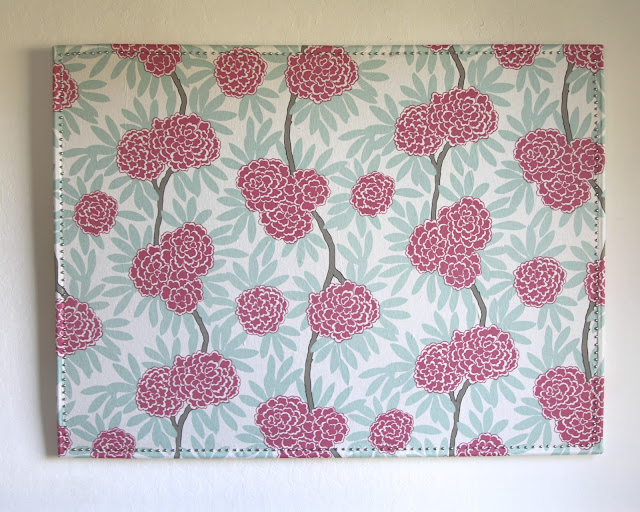
I made this for my office, having recently seen something similar on Pinterest. I used this gorgeous Mint Fleur Chinoise upholstery weight fabric, left over from my chair makeover, for my pin board, and silver tone upholstery nails for the trim.

My massive pin board via my Instagram

I love this print so much, I was stoked to have enough left over to cover my pin board! 

Fabric Wrapped Pin Board with Nail Trim

What you need:
1 cork board
fabric to cover cork board with a few inches to spare
nailhead trim
adhesive spray
stapler


What to do:
1. Iron your fabric thoroughly.
2. Adhere fabric to your pin board, using the spray adhesive. Start in one corner, and work your way across, making sure the fabric is completely smooth everywhere.
3. Line rim/frame of pin board with nail trim (my least favorite part of this project - it's quite hard on the fingers/thumbs). Make sure you place the nails straight, and with equal distance all the way around.
4. Flip board upside down, wrap the fabric around the edge/frame, and staple the fabric securely to the back.
5. Done!


This is such a quick, easy little diy that makes such a big difference! Now my pin board actually adds to my room decor, instead of being a boring, brown eyesore.


Materials:

1 yard Caitlin Wilson Mind Fleur Chinoise fabric
300 upholstery nail trim nails
adhesive spray glue

Thursday, January 3, 2013

DIY Project: Pom Pom Garland

I've seen pom pom garlands all over the place lately, and as I love pom poms, I've been dying to make my own for ages, to decorate the rack of the faux taxidermy deer head in my office. The other day, the massive bag of Pom Poms I ordered online finally arrived on my door step, and I made this garland this morning.


DIY Project: Pom Pom Garland

This project is super easy, very fast from start to finish, and so so cute!

What you'll need: 
pom poms
string, yarn, or fishing line
embroidery needle

You can use any type of pom poms for this project; felt, yard, or "fuzzies" like these.

What to do:
1. Starting 12 inches from one end of the string (or however long you think you'll need to attach the garland when using it), start adding a pom pom by spearing through it with your needle and thread. You can knot the thread around each pom pom, but if they sit fairly snug on the string, like min did, there's no need.
2. Repeat step 1, for however long you want your garland, adding another, and another, leaving a suitable space between each pom pom. Leave extra string on the other side as well.
3. Done!

I used an embroidery needle to make my garland, which worked well, but regular sewing needles would also have worked.

Perfect for holiday or party decor, or to spruce up a faux taxidermy rack. I also have tons of left over pom poms, and several other pom pom projects coming up!

 via my Instagram

I love my little pom pom garland! It fits in perfectly in my office!

Tuesday, January 1, 2013

DIY Project: Ribbon Hair Ties (Retail Knockoff)

Have you seen these awesome ribbon style hair ties? I love them, as they do not leave a "pony tail dent" in my extremely straight hair, even if I wear them all day. They usually retail for a ridiculous $1-$3 a pop (!!!), and I've been meaning to make my own for quite some time. I finally pulled the trigger, and when I calculated the cost of making these, and compared it to the retail versions, I'm glad I didn't wait another day.

I ordered plain elastic online here, and printed and glitter versions here, for next to nothing compared to the  retail prices! I was honestly appalled when I found this stuff for $1.35 for FIVE yards, and you can make 3-4 hair ties per yard. It seems a lot of people must be rolling in their crazy hair-tie profits!


DIY Project: Ribbon Hair Ties

Make plain sets, tie them off in a knot or bow, ends going in the same direction, or not. It all looks different on the pony tail (& on the wrist), so experiment to find which style you like best. Pretty coordinated sets makes for a cute little gift, or party favor.

What you'll need:
Fold Over Elastic, (FOE)

ruler or measuring tape
very sharp scissors

Ok, so maybe I went a little bit overboard when ordering supplies... I was exited.

What to do:

1. Measure between 8"-10" piece of FOE, depending on hair thickness and personal preference. I use a 10" for my hair ties, and it makes for the perfect tie for my hair (& my wrist).
2. Cut elastic, fold with pretty side out, and tie a knot or bow. Experiment with the type of knot, to find the look you like best. Clean up FOE edges (if needed).
3. Voila! Your hair tie is finished!

I made my hair ties in bulk, moving the entire batch through each step before moving on to the next. 
For example, I cut all my 10" FOB first, tied all of them, and then trimmed all the edges after that. Still, it was quite fast!

Retail:
Emi-Jay (the original): different collections of 5, ranging from $10.99 - $12.99
DIY:
DIY Ribbon Hair Ties, $1.35 for 20
DIY Printed Ribbon Hair Ties, $0.90 for 4
DIY Glitter Ribbon Hair Ties, $1.20 for 4 


Can you tell which hair ties are my DIY version and which ones are Emi-Jay brand?

DIY vs Retail. Can you tell the difference?

Crazy, right? I mean, that's really CRAZY!!! So, do yourself a favor and DIY some of these. It takes about a minute, and both your hair & your wallet will thank you.

Coordinated hair tie sets, ready for gifting

After having completed 42 DIY projects in 2012 (not counting redoes, multi-post reveals, food, etc.), and I'm looking forward to increasing that number in 2013. My goal is to complete 52 projects, averaged over the next 52 weeks. Given travel etc., that sounds challenging, yet achievable. This quiet, low key project was the perfect activity for a lazy day recovering from bringing in the New Year.

Saturday, December 29, 2012

DIY Project: Floral Sunglasses

I almost died when I first saw this tutorial from Honestly... WTF, it was Love At First Sight. I knew I had to make a pair. Or twenty.

Here is what I came up with:


I used a cheap pair of Sunreaders (I never even knew these existed before my eyes got old and crappy), e6000 glue, and some resin flowers ordered from Etsy to make my shades. They took about 10-15 minutes to make, and only that because I had to wait for the glue to get tacky enough to hold the flowers to the frames while it dried completely. 


My favorite type of DIY: quick, easy and oh, so fabulous!


Now all I want to do is drive down HWY 1 with the top down, blasting Lana Del Ray (and singling along at the top of my lungs), while shielding my eyes from the sun with these fabulous shades!

Saturday, December 22, 2012

DIY Project: Studded iPhone Case

I've been using a simple, clear case ever since I upgraded my iPhone 4 for a 5. I've seen a bunch of these studded cases lately, and really liked them, but none of the ones I saw were made to fit the iPhone 5. I also didn't want a colored case with studs, I wanted a clear case with studs. Since I couldn't find one, I figured I'd just make my own.

This is what I came up with:


DIY Project: Studded iPhone Case

What you'll need:
hard iPhone case
flat studs
strong glue

long bamboo skewers or tooth picks (or what have you) to apply glue & move studs around


What to do:
1. Determine your pattern first. Use a ruler and a pencil, or tape if your case material won't tolerate pencil, as a guide if you feel like you need it. I free-handed mine, and they turned out fine.
2. Add a small amount of glue to a paper plate, it dries quickly, so refresh as needed. Start gluing your studs, being careful to place them straight and evenly.
3. Wait [impatiently] while the glue dries.

Voila! Awesome iPhone case!


Cost:
Clear iPhone 5 hard case, $2.99
100 flat stud, $9

Each case came out to approximately $7 each.


Now I just need to decide on which I will use first, gun metal, or silver? 


Thursday, December 20, 2012

DIY Project: Striped Baby Quilt

I started another quick little baby quilt last night, cut, pieces, and quilted it in one sitting, then finished the binding this morning.


For the top I used the same print as in my 1 Day Baby Quilt, Michael Miller's Wood Horses print, but in pink instead of the coral, and this time paired with 8 different shades of solid pink cotton.


I used half a yard of the Wood Horses print (same amount as last time), and a fat quarter of each of the other colors. I used 2 yard of a solid gray cotton for the backing. I made the binding from left over pink strips from the quilt top, and thus using up all 8 fat quarters. 


This time I did have enough backing material left to do a double layer binding, first folding the gray backing over the raw edge, and then adding my homemade double binding on top.


Although I mainly make it this way for added durability, I really love the look of the gray peeking out under the top layer, pink binding.


For batting I used a low loft organic bamboo batting, which makes for very thin, light, fluffy quilts. It came out of the dryer all crinkly soft, and I hope that my friend, Kristina, and her little baby girl, will get a lot of use out of it.


Fabrics:

Quilt top:
Michael Miller 'Wooden Horses' in pink and gray
8 fat quarters of Robert Kaufmann Kona Cotton, in 8 different shades of solid pink

Backing:
2 yards solid gray Kona Cotton

Binding:
Robert Kaufman Kona Cotton, in 8 different shades of solid pink

Wednesday, December 5, 2012

DIY Project: Felt Christmas Tree with Ornaments

I got this idea from Pinterest (of course) months and months ago, and while there are countless versions of this project out there, I really like this tutorial from the blog Johnny In A Dress.

As soon as I first saw this, I thought of a certain little Swedish girl, who I knew would LOVE something like this for the holiday season. But the holidays were still very far away at the time, so I filed it away for later in the year.


I finally made this project this week, and the whole thing took about 30 minutes from start to finish! All you need is about 1 yard of green felt, plus some colored felt for decorations, a scissor, and hot glue.


Unlike the original tutorial, I used a mix of plain and patterned felt, instead of decorating the ornaments myself. I also hot-glued a star to the top of the tree.


I added a couple of gift tags to some of the gifts under the tree, one with the gift-recipient's name, and one with "God Jul", which is Swedish for Merry Christmas.


I also added one gift with an unsealed top edge, to use as a pocket for the ornaments when not in use.


I attached the tree using wide, double-sided tape, and it worked brilliantly.


I hope this little felt tree will give a certainly little girl, who according to her mom "likes to re-decorate the tree every single day", a lot of joy this holiday season.