Showing posts with label Tutorial. Show all posts

Thursday, February 7, 2013

DIY Project: Bunting Garland Photo Prop

I made these bunting garlands to use as photo props for an upcoming photo shoot with my baby niece, but of course, it could just as well be used as decor for a nursery, as a party prop, or whatever else that could benefit from the addition of a charming little banner.


This is a very simple project, similar to my Retail Knockoff version of Kata Golda's Winter Holiday Banner, but this time in cotton fabric instead of Felt. I made a few different versions.

DIY Project: Bunting Garland Photo Prop

For one banner, personalization optional.

What you need:

Cotton fabric in coordinating colors for 15 bunting flags
3 yards twill tape, binding, twine, or ribbon

optional: contrasting fabric for letters

What to do:

1. Cut 15-ish bunting flags of desired shape and size.

from my project sketch  

2. Serge or zig-zag around the raw edges of each flag, to prevent unraveling, or leave them raw, depending on the look you want. Alternatively, cut twice as many flag as needed, and place them in pairs, right side facing, and sew around the hanging sides (not the one that will be attached to the twill tape), then turn right side out and press.

3. Optional: spell a name or greeting by cutting letters of contrasting fabric and sew onto banners. If spelling several words on one banner, leave blank banner as divider between words. IF using a two layer method, add letters BEFORE pairing to hide the seams.

Two double cloth banners, one with closed seams, one with edges left raw.

4. IF using twill tape, space your flags onto your twill tape, either by overlapping, edge to edge, or spaced a couple of inches apart. Fold pennants over the top of the twill tape and sew across to secure.
IF using biascut binding (which is great for banners), just stick your flags inside the fold at desired distance apart, and sew across to secure. Remember to leave approximately 10 inches spare length of tape at each side of the flags for hanging.

Bias-cut binding is perfect for bunting garlands! Stick the flags inside, and secure across the top.

5. Your banner is done!

3 different size & shape bunting garlands, to be used as a photo backdrop.

Thursday, January 3, 2013

DIY Project: Pom Pom Garland

I've seen pom pom garlands all over the place lately, and as I love pom poms, I've been dying to make my own for ages, to decorate the rack of the faux taxidermy deer head in my office. The other day, the massive bag of Pom Poms I ordered online finally arrived on my door step, and I made this garland this morning.


DIY Project: Pom Pom Garland

This project is super easy, very fast from start to finish, and so so cute!

What you'll need: 
pom poms
string, yarn, or fishing line
embroidery needle

You can use any type of pom poms for this project; felt, yard, or "fuzzies" like these.

What to do:
1. Starting 12 inches from one end of the string (or however long you think you'll need to attach the garland when using it), start adding a pom pom by spearing through it with your needle and thread. You can knot the thread around each pom pom, but if they sit fairly snug on the string, like min did, there's no need.
2. Repeat step 1, for however long you want your garland, adding another, and another, leaving a suitable space between each pom pom. Leave extra string on the other side as well.
3. Done!

I used an embroidery needle to make my garland, which worked well, but regular sewing needles would also have worked.

Perfect for holiday or party decor, or to spruce up a faux taxidermy rack. I also have tons of left over pom poms, and several other pom pom projects coming up!

 via my Instagram

I love my little pom pom garland! It fits in perfectly in my office!

Tuesday, January 1, 2013

DIY Project: Ribbon Hair Ties (Retail Knockoff)

Have you seen these awesome ribbon style hair ties? I love them, as they do not leave a "pony tail dent" in my extremely straight hair, even if I wear them all day. They usually retail for a ridiculous $1-$3 a pop (!!!), and I've been meaning to make my own for quite some time. I finally pulled the trigger, and when I calculated the cost of making these, and compared it to the retail versions, I'm glad I didn't wait another day.

I ordered plain elastic online here, and printed and glitter versions here, for next to nothing compared to the  retail prices! I was honestly appalled when I found this stuff for $1.35 for FIVE yards, and you can make 3-4 hair ties per yard. It seems a lot of people must be rolling in their crazy hair-tie profits!


DIY Project: Ribbon Hair Ties

Make plain sets, tie them off in a knot or bow, ends going in the same direction, or not. It all looks different on the pony tail (& on the wrist), so experiment to find which style you like best. Pretty coordinated sets makes for a cute little gift, or party favor.

What you'll need:
Fold Over Elastic, (FOE)

ruler or measuring tape
very sharp scissors

Ok, so maybe I went a little bit overboard when ordering supplies... I was exited.

What to do:

1. Measure between 8"-10" piece of FOE, depending on hair thickness and personal preference. I use a 10" for my hair ties, and it makes for the perfect tie for my hair (& my wrist).
2. Cut elastic, fold with pretty side out, and tie a knot or bow. Experiment with the type of knot, to find the look you like best. Clean up FOE edges (if needed).
3. Voila! Your hair tie is finished!

I made my hair ties in bulk, moving the entire batch through each step before moving on to the next. 
For example, I cut all my 10" FOB first, tied all of them, and then trimmed all the edges after that. Still, it was quite fast!

Retail:
Emi-Jay (the original): different collections of 5, ranging from $10.99 - $12.99
DIY:
DIY Ribbon Hair Ties, $1.35 for 20
DIY Printed Ribbon Hair Ties, $0.90 for 4
DIY Glitter Ribbon Hair Ties, $1.20 for 4 


Can you tell which hair ties are my DIY version and which ones are Emi-Jay brand?

DIY vs Retail. Can you tell the difference?

Crazy, right? I mean, that's really CRAZY!!! So, do yourself a favor and DIY some of these. It takes about a minute, and both your hair & your wallet will thank you.

Coordinated hair tie sets, ready for gifting

After having completed 42 DIY projects in 2012 (not counting redoes, multi-post reveals, food, etc.), and I'm looking forward to increasing that number in 2013. My goal is to complete 52 projects, averaged over the next 52 weeks. Given travel etc., that sounds challenging, yet achievable. This quiet, low key project was the perfect activity for a lazy day recovering from bringing in the New Year.

Wednesday, December 5, 2012

DIY Project: Felt Christmas Tree with Ornaments

I got this idea from Pinterest (of course) months and months ago, and while there are countless versions of this project out there, I really like this tutorial from the blog Johnny In A Dress.

As soon as I first saw this, I thought of a certain little Swedish girl, who I knew would LOVE something like this for the holiday season. But the holidays were still very far away at the time, so I filed it away for later in the year.


I finally made this project this week, and the whole thing took about 30 minutes from start to finish! All you need is about 1 yard of green felt, plus some colored felt for decorations, a scissor, and hot glue.


Unlike the original tutorial, I used a mix of plain and patterned felt, instead of decorating the ornaments myself. I also hot-glued a star to the top of the tree.


I added a couple of gift tags to some of the gifts under the tree, one with the gift-recipient's name, and one with "God Jul", which is Swedish for Merry Christmas.


I also added one gift with an unsealed top edge, to use as a pocket for the ornaments when not in use.


I attached the tree using wide, double-sided tape, and it worked brilliantly.


I hope this little felt tree will give a certainly little girl, who according to her mom "likes to re-decorate the tree every single day", a lot of joy this holiday season.

Monday, December 3, 2012

DIY Project: Candy Cane Centerpiece

I made these Candy Cane Centerpieces for the first time last year, after finding a tutorial on Pinterest, and I knew right away that this was a project I would repeat many times over. However, this year when I went back to my old pin to refresh my memory, the link seems to be broken, and the tutorial missing. I had planned to link to it, with photos of my finished project, but instead I'm posting my method as I remember it. I don't know how closely it matches the original tutorial, as I haven't' read it in a year (should be fairly close though, as this is a really easy project), but this worked perfectly for me today, and the end result looks fairly similar to the original picture that was my inspiration. If you do happen to find the original tutorial, please let me know so that I can link and credit the original source. 


DIY Project: Candy Cane Centerpieces

These are perfect for a holiday party, a quick hostess gift, or as part of your holiday decor. Besides roses, I also filled a few of them with candles, and both looked fabulous (photos to come).

What you'll need:
1 clean glass container
1 rubberband or elastic that fits tight around the glass container
candy canes (number depends on size of glass container)
ribbon (length depends on size of glass container)
red roses and greenery OR large candle or luminary

What to do:
1. Fit elastic around the glass container.
2. Add candy canes between the elastic and the glass, making sure the elastic is tight enough to hold the candy canes in place. Continue to add candy canes until they cover the entire circumference of the glass container.
3. Straighten candy canes, and tie ribbon around candy canes, on top of the elastic, hiding it.
4. Your base is now finished. Trim roses to the correct length, making sure flowers form a slight dome shape, and arrange together with greenery in the glass container. Add water. Alternatively, add a candle instead.
5. Done!


Sunday, December 2, 2012

DIY Project: Quick and easy Cheesy Christmas Ornament Earrings

I saw these earrings this morning at Target, and thought they would be perfect for a cheesy holiday get-together with some fabulous, holiday-loving girlfriends. I also realized I already had all the necessary supplies to make my own version at home.


This is what I came up with.


I made a bunch of them, in different shades of red & silver, and I cannot wait to wear these cheesy things to various holiday-related shenanigans! Now I just need a hideous reindeer sweater & decide if I'm mixing or matching the ornaments!

This project is so simple that it barely even needs a tutorial. Still, here are the very simple instructions to make your own Cheesy Christmas Ornament Earrings. Making time is approximately 2 seconds. No kidding.

DIY Cheesy Christmas Ornament Earrings

To make one pair of Cheesy Christmas Ornament Earrings.

What you need:
2 French wire earring hooks
2 mini ornaments, glass or plastic
2 jump rings


What to do:
1. Open jump ring just enough to slip on 1 Sterling silver French wire earring hook, and one mini ornament.


2. Close jump ring.
3. Repeat once again, to make a pair.
4. Done!

Price Comparison:

Original inspiration:
Happy Holidays Ornament Earrings, Target, $7.99 per pair

DIY Retail Knockoff:
$1 per pair


Saturday, December 1, 2012

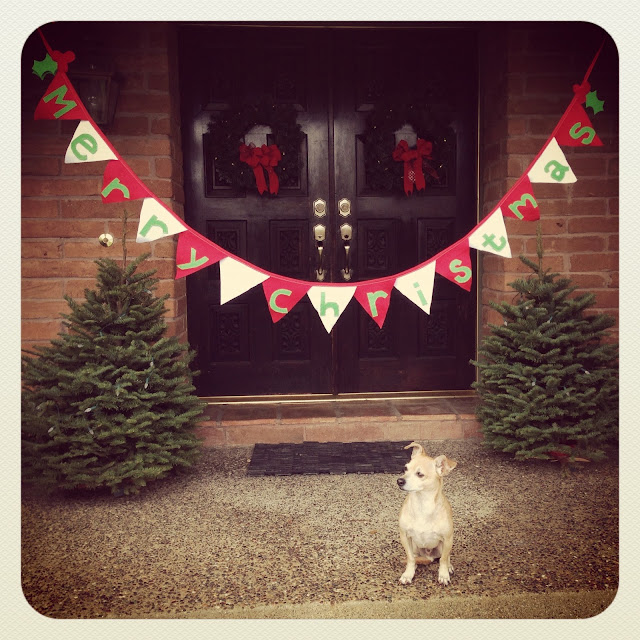
DIY Project: Winter Holiday Banner (Retail Knockoff)

I saw these adorable Kata Golda Winter Holiday Banners on Gilt the other day, for $100, discounted from the original $140. First I thought "Cute!", followed by "$100 for $10 of felt?!?". But... but... this thing is a perfect match for my Holiday decor! It would look so cute in my house!!! However, while very cute, it's worth nowhere near $100. So, I tried to make something similar myself.

Image source: katagolda.com


This is what I came up with.

DIY Project: Winter Holiday Banner Tutorial (Retail Knockoff)

I used the original specifications as a guide. Pennants are 7"x7", spelling the words "Merry Christmas" with one blank pennant included to create a space between words. Length is 86" plus an extra 32" of twill tape for hanging on each end.

What you will need:


White felt
Red felt
Light green felt
150" 0.75" twill tape, natural (I used red because I had some, but if I did another banner, I would make sure it was natural, or white instead)
Sewing machine with matching thread OR hot glue gun
apple green embroidery thread and needle (optional)

What to do:

1. Cut 8 red 7"x7" felt pennants, 7 white 7"x7" pennants, and 14 3"x3" squares of the apple green felt.


2. Cut out your letters from the light green felt squares, freehand or use a pencil to trace them first. Also cut out 6 green holly leaves, and 4 copies of the three red berries (or however many you would like, I made a few less than the original).


3. Attach letters to the pennants. The original banner have the letters attached by hand stitching, using a matching green thread, and they may or may not have been glued on first. You can either hot glue the letters in place, or attach them using a sewing machine, and then adding the green stitching afterwards, alternatively, just doing the hand stitching. I felt a bit iffy about the quality & longevity of my hand stitches, so I machine-stitched mine first. Remember to leave one blank pennant to create a space between the words.


4. To attach the pennants to the twill tape, lay your tape out on a large work surface, and measure 33" from one end. Place your pennants in the proper order, overlapping slightly (around 1") with each one. Don't forget the blank pennant between the words. For the original look, fold the pennants over the twill tape and zigzag over the fold. If you're using bias cut tape in place of twill tape, like I am, instead fold the double folded tape over the edge of the pennants, and attach either by matching stitching across each pennant on the twill tape (like the original), or, by using a hot glue gun.


5. Assemble your leaves and berry pieces for the decor, and lay them back to back, with the tape in the middle, on either side of the letters. Hand, machine-stitch or hot glue the berry decor onto the twill tape, one on each side of the pennants. I machine-stitched the berry pieces together over the tape, with the leaves in between.


6. If you want the same finish as the original, hand-stitch the light green embroidery thread around all the letters. This step isn't necessary, obviously, and it takes this project from a quick 30 minute project to a rather time consuming endeavor. In this case, the extra work is actually worth it, and the hand stitches add a really nice touch. While my banner looked fine before the stitches, it looks fantastic with them!


7. Voila! While my banner has slight differences from the original, and my photo isn't quite as fancy, in person they are actually very similar, and I'm very happy with my little holiday banner. It's very festive!


Cost Comparison:

Original:
$140, through Kata Golda website, or $100 at Gilt

DIY Retail Knockoff (generous approximation, since I had the supplies left over from previously projects): 
Felt: $5
Twill tape: $5
Embroidery thread & needle: $5
Total: $15

$15 compared to the original $140! Not a bad "retail knockoff". This project can be altered to fit any occasion, and I'm making a 'Happy Birthday!" one next. Of course, I'll post photos when it is finished.

Sunday, October 28, 2012

DIY Project: Pin Cushion Jars Tutorial

I love these Pin Cushion Jars! They look cute, are easy to make, useful when you're sewing, and last but not least, you can keep pins safely tucked away inside while you're not using them. This is a quick and easy little project to put together, that makes a great gift for anyone who likes sewing. I made these for the fabulous ladies in my book club (sorry ladies for the spoiled surprise).


DIY Project: Pin Cushion Jars Tutorial
Each jar takes but minutes to complete, and lends itself well to making a bunch at a time. It is a perfect scrap buster.

What you'll Need:
canning jars, any size
fabric scraps - I used some charm pack leftovers from another project
batting
hot glue

What to do:
1. Unscrew your lid, and take it apart.


2. Lay the flat piece on a fabric scrap, and cut around it, with 1-2 inches extra fabric around all sides (since I used fabric from a charms pack, I didn't bother making mine perfect circles and instead kept them square, but it didn't make a difference). Then cut your small circle. Using your lid as a guide, cut your circle about 1/2 inch smaller than the lid.
3. Place your lid face down on your larger fabric piece, grab some batting and stuff under the lid, folding the extra fabric over the lid edges.


4. Add a line of glue to the lid, under the folded flap of fabric, and attach the fabric as smoothly as you can. Work your way around the lid, gluing and smoothing down the fabric as you go. If needed, add some more batting before you clue the last bit of the circle.


5. Trim off any excess fabric.
6. Glue your small circle on top of the fabric edges, pressing down firmly, to prevent as much bulk as possible. Let dry.


7. Place lid ring on top of the fabric side, and let the stuffed pouff poke out of the hole, screw the lid onto your jar and you're done!


Stuffed with some goodies, like candy, a bundle of fat quarters, or small sewing supplies, they make a nice little gift for crafty friends.

Tuesday, July 17, 2012

DIY Project: Waterproof Bikini Bag Tutorial

I first saw these Bikini Bags at a department store ages ago (find some here). I loved the idea, and through it was perfect for a DIY. This past weekend I decided to finally give it a try. The end result? These small-but-fabulous, waterproof, wristlet-style Bikini Bags. I love, love, LOVE them! They are the perfect solution to the classic summertime wet-bikini-in-your-beach-bag problem. You see, these little zipper pouches are lined with oil cloth, to keep the wet stuff away from the not-so-wet-stuff. So no more waterlogged paperbacks/e-reader in my beach bag!


What's even better? This project is super easy!

DIY Project: Waterproof Bikini Bag

What You'll Need:
2 10x8 inch pieces of exterior fabric (interfaced)
2 10x8 inch pieces of waterproof/water resistant lining fabric - I used oil cloth
1 3x22 inch piece of exterior fabric for ring loop and wristlet strap
1 ring loop
1 strap clasp
1 10 inch zipper

iron-on letters or DIY appliqué letters (optional)

Direction:
1. If you want to add any lettering, do that before you start constructing the bag. Same thing if you're adding a label.

2. Start with your exterior fabric, right side up, and place your zipper on top, teeth side down, lining up the edge. Lay one piece of lining fabric (oil cloth) on top, right side down. Pin if you want to. Using your zipper foot, sew seam with a 1/4" seam allowance. Turn over and stitch over where exterior material meets zipper, right by the edge.

Exterior fabric facing up, zipper teeth facing down, and lining facing down

3. Lay your remaining exterior fabric right side up, and place your zipper, teeth side down. Add remaining lining oil cloth, right side down, on top of the zipper. Sew. Turn over and stitch over where exterior material meets zipper, right by the edge.

 Exterior fabric facing up, zipper teeth facing down, lining facing up

Now you will have 2 pieces of fabric, exterior plus lining, attached to each side of your zipper 

4. To make the strap, fold the long strip of exterior fabric, right sides together, and sew with a 1/4" seam allowance. Turn right side out, and press strap, with the seam in the middle. Sew the entire strap again and again, at a 1/4" seam allowance.

You will end up with one long strap, just like this one

5. Cut off a 3 inch piece of the strap, this is your ring tab.  If you're using a ring that does not open, tuck it into the tab now. Close with a seam to secure ring.

Ring loop

6. Open the zipper halfway (!!!), and fold rights sides together. Tuck ring tab between the exterior pieces of fabric, with the tab's raw edge pointing out.

Make sure the tab is oriented with the raw edge pointing out

7. Sew around the entire perimeter, leaving a gap in the lining for turning the bag. Miter the corners, on both on the exterior fabric and the lining. Cut of excess corner fabric, turn right side out, and push out  the corners.

Inside out - here you can see the raw edge of the ring tab poking out

8. Close the gap you left in the lining, and tuck lining pouch into exterior pouch.

Your zipper pouch is completed, and should look a little something like this

9. To make the strap, fold one end of the strap around the ring in your ring loop, making sure to tuck in the raw edge. Stitch a box onto on top of fold, several times, until it is secured.

With the strap attached

10. Here you can finish the bag off either with a simple wristlet loop, or you can add a clasp, like I did. Measure out how long you want your strap, adding an inch for the fold, and cut.


Measure what strap drop length you would like, 4-5 inches is typical. 

11. Attach the clasp, at the remaining end of your strap, the same way you attached the strap to the loop ring above. If you're not using a clasp, attach the end of the strap at the same place as you attached the first end, using the same method.

I wanted to be able to secure the wristlet strap around the strap in my beach bag, so I added the clasp.

12. Bikini Bag is done!!!! Enjoy coming home from the beach with your WET bikini and a DRY bag, a DRY book, and a DRY phone, forever (or, you know, every time you actually remember to bring this thing...).

Completed Bikini Bags

I made a bunch of these at the same time, in a few different sizes. Some small for a single bikini, some large to fit multiple bikinis, a swimsuit, or rashguard. The big one is 12x10 inches, the smaller one is 8x9 inches. Adjust size of the pouch to your liking.

Bikini bag can hold more than bikinis...

Bikini bag in action, wet bikini inside - I did try my bag already, and I'm happy to report that it worked perfectly!

After having had this idea for ages, and I'm glad I finally pulled the trigger. The bags are quick and easy to make, especially if you make a few of them at a time, like I did.  I can already think of a gazillion different occasions to use these, from the beach, the pool, to vacay. Of course, they also make a nice gift, that can be personalized as well (bridesmaids' gift at destination wedding, anyone?).


The bag made in this tutorial is the actually 3rd version of this bag. It's not very different from the first one I made, but since the starting point was pure improvisation, with each one I find some place to improve the design. Let me know if you give these a try, especially what changes/improvements you would make. I'd love to see what you come up with!